PosHUB Integration
Connects PosHUB with the Newo AI agent so callers and chat visitors can place, check, and cancel restaurant orders directly through the agent — using the live PosHUB menu — without a human taking the order.
Time to first success: ~15 minutes if you already have a PosHUB account, a registered developer application, and reseller (admin) credentials. ~30–45 minutes if PosHUB still has to provision your sandbox or approve the password grant.
Before You Start
Make sure you have:
- an active PosHUB account on a plan that allows external API access;
- admin / reseller access to PosHUB — you'll need it to obtain reseller credentials (admin username and password), to create the developer application, and to paste two webhook URLs into the PosHUB application settings;
- access to the PosHUB Developer Portal so you can create a new application during setup (or an already-issued application is fine — you'll still need to paste the webhook URLs into it);
- access to the Newo Builder for your project, with permission to create a project and click Publish All;
- at least one PosHUB location with a published menu — otherwise the agent has nothing to sell;
- if you are still on the staging environment, a confirmation from the PosHUB team that the password grant is enabled for your application (it is opt-in and required for the reseller onboarding the integration uses).
What the AI can do
- Place an order through the agent. The agent walks the customer through item selection, modifiers, customer details, and a final summary, then submits a real PosHUB order — never asks the customer to use a website link or SMS link.
- Answer menu questions live. The agent only mentions items, modifiers, sizes, and prices that are present in the synchronized PosHUB menu — no invented items.
- Check the status of an existing order. The customer asks where their order is and the agent reads the current status from PosHUB.
- Cancel an existing order. The customer asks to cancel and the agent submits the cancellation, then reports back what PosHUB returned.
- Stay in sync with the kitchen. When PosHUB publishes a menu update or flips the store online / offline / closed, the integration receives a webhook and updates what the agent knows.
- Hand off to a human when needed. If the store is offline, an item is unavailable, or PosHUB rejects the order for a technical reason, the agent transfers the call (during working hours) or relays a message to the manager (off hours) instead of pretending it succeeded.
Synchronized menu — how it stays current
The agent never reads the PosHUB menu live during a conversation; it reads a cached copy that the integration refreshes in the background. This keeps responses fast and avoids hammering PosHUB with every customer question.
| When it happens | What the agent does |
|---|---|
| First Publish All finishes onboarding | Pulls the current menu for the chosen PosHUB location and stores it as a synchronized snapshot. |
| PosHUB publishes a menu update | Receives a webhook, refreshes the snapshot, and the next customer sees the updated menu. |
| Store status changes (online / offline / closed) | Receives a webhook and updates what the agent reports if a customer asks. |
| Snapshot older than the freshness window | Refreshes on the next conversation that touches an order scenario. |
The agent only uses items, modifiers, and prices from this snapshot. If a customer asks for something not in it, the agent will say so and offer alternatives instead of guessing.
Current runtime behavior. The full synchronized snapshot stays in cache, but the order flow does not dump the whole menu into every prompt. On each
broadcast_analyze_conversationevent, the integration selects the most relevant menu categories from its local AKB and injects only that narrowed JSON into the runtime sectionPosHUBMenuInfo role="context". If no narrowed slice is available, the order flow falls back to the full synchronized menu snapshot automatically.
Features at a glance
| Feature | Included |
|---|---|
| Place orders through the agent | ✅ |
| Live menu knowledge (items, modifiers, prices) | ✅ |
| Required-modifier enforcement | ✅ (agent will not submit until the customer chooses) |
| Order status lookup | ✅ |
| Order cancellation | ✅ |
| Pickup fulfillment | ✅ (default) |
| Delivery fulfillment | ✅ (only when the customer explicitly asks) |
| Store-online / offline awareness | ✅ (webhook-driven) |
| Auto menu refresh on PosHUB publish | ✅ (webhook-driven) |
| Editing the menu from the agent | ❌ (PosHUB is the source of truth) |
| Taking payment in the conversation | ❌ (PosHUB processes payment on its side) |
| Multiple PosHUB locations on a single agent | ❌ (one location per project — change the PosHUB Location setting and republish to switch) |
| Calendar bookings or appointments | ❌ (PosHUB is an ordering platform, not a calendar) |
Setup
Create the Newo project
If this project already exists in Newo Builder, skip this subsection and continue with the integration-specific settings below.
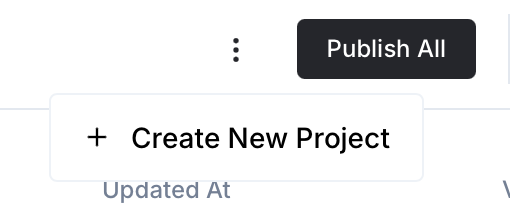
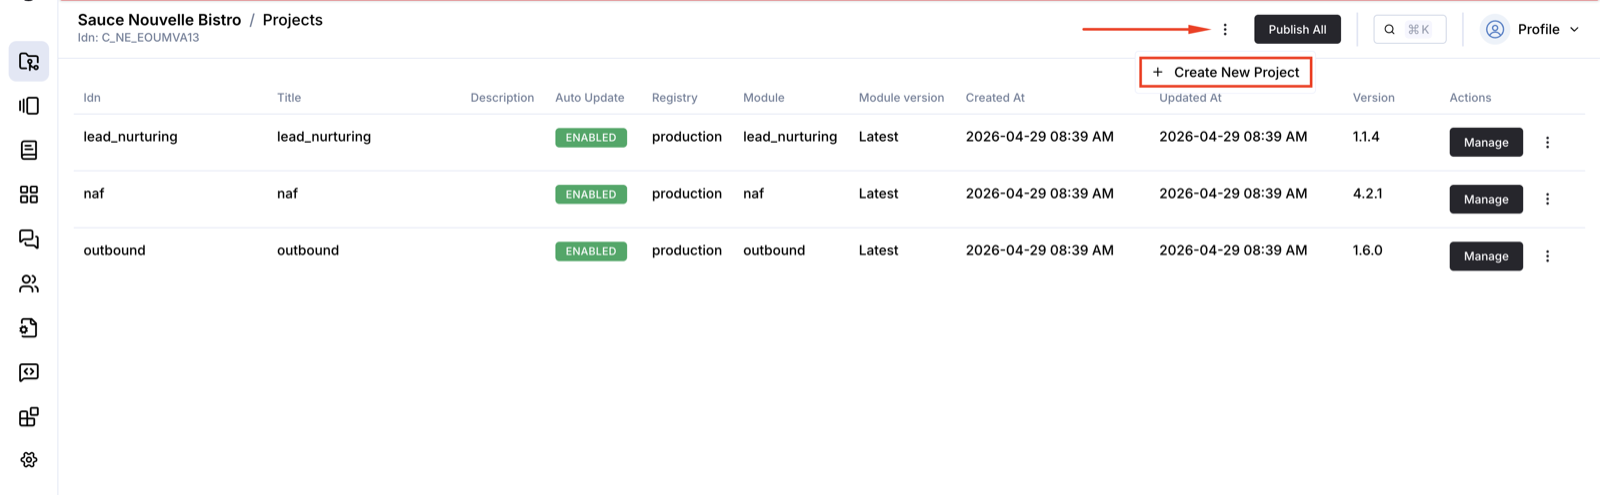
- In Newo Builder, open the projects list and click Create Project (or Create New Project from the top-right menu).
- Fill IDN and Title. The exact names do not matter; use any clear names your team will recognize.
- In Registry, choose the release channel:
- staging — the newest module fixes appear here first. Use it when you need the latest fix, but expect possible unfinished changes.
- production — the final stable version for live projects.
- In Module, select the module for this integration.
- Leave Module version on Latest version unless support tells you to pin a specific version, then click Create.
Why the order matters. The PosHUB application wizard requires two webhook URLs in Step 3 — Configuration, and those URLs are generated by Newo during the first Publish All. The setup below therefore starts in Newo Builder to obtain the URLs, then jumps to PosHUB to create the application, then comes back to Newo to paste the Client ID, Client Secret, and Reseller ID.
If you already have a PosHUB application in production, the same flow still works — just paste the new webhook URLs into the existing application's settings instead of creating a new one.
What you need before you start
| Credential | Where to find it | Required at step |
|---|---|---|
| PosHUB admin username | PosHUB reseller-admin user issued to you | Step 3 |
| PosHUB admin password | PosHUB reseller-admin user issued to you | Step 3 |
| PosHUB Client ID | Generated by PosHUB after you create the application | Step 12 |
| PosHUB Client Secret | Generated by PosHUB after you create the application | Step 12 |
| PosHUB Reseller ID | Visible in your PosHUB reseller dashboard URL | Step 13 |
Store secrets safely. The Client Secret and admin password are written to your project's settings store; anyone with edit access to the project can read them back. Treat them like any other production credential.
Step 1 — Create the project in Newo Builder
Sign in to Newo Builder, open your projects list, and click the ⋮ (more) menu in the top-right, then choose Create New Project.
Step 2 — Fill in the project form
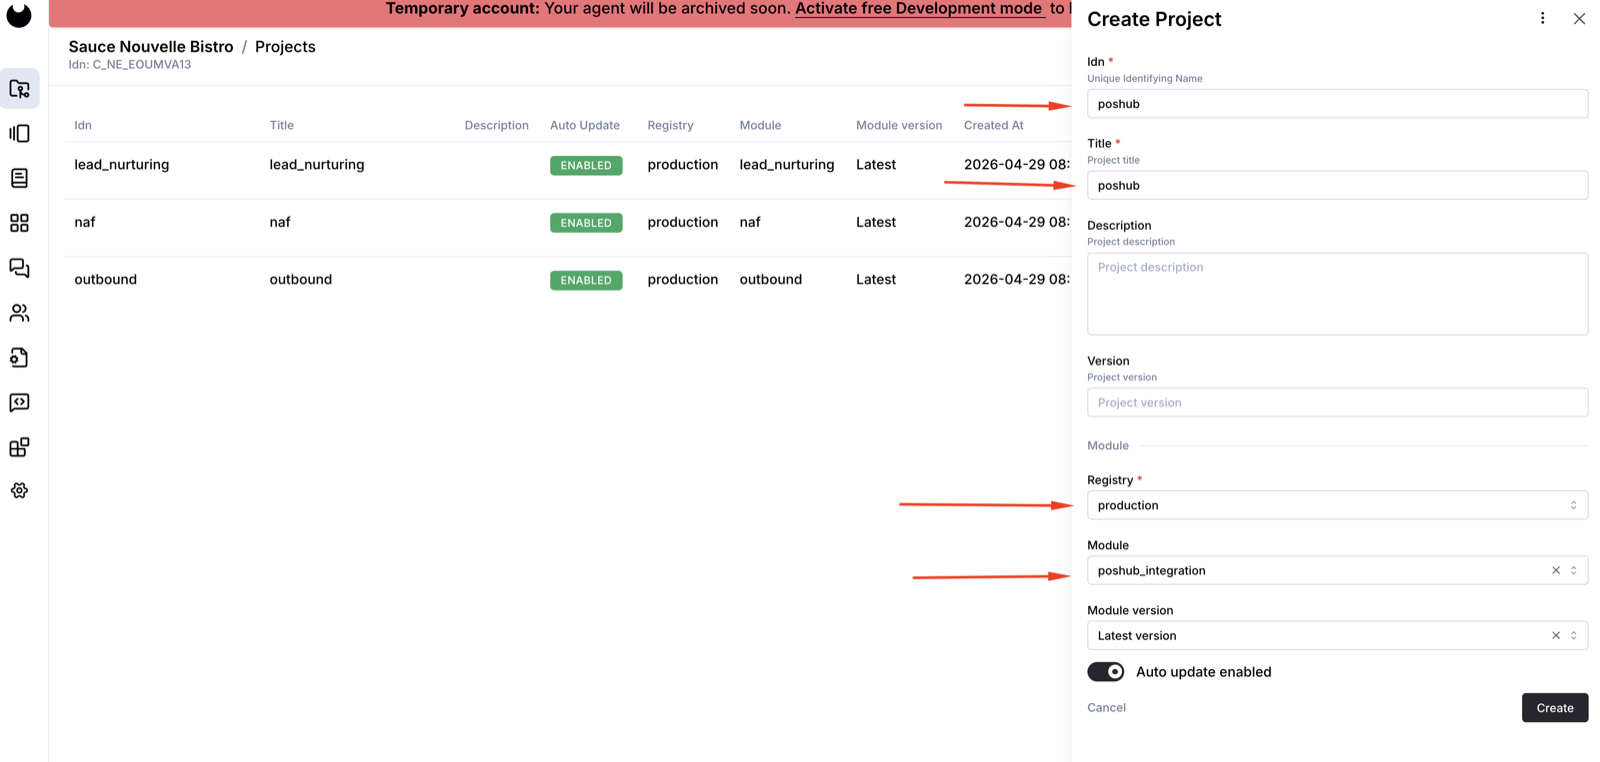
In the Create Project panel, set:
- Idn —
poshub - Title —
poshub(or any human-friendly name) - Registry —
production - Module —
poshub_integration - Module version —
Latest version - Auto update — keep enabled
Click Create.
Step 3 — Open the new project
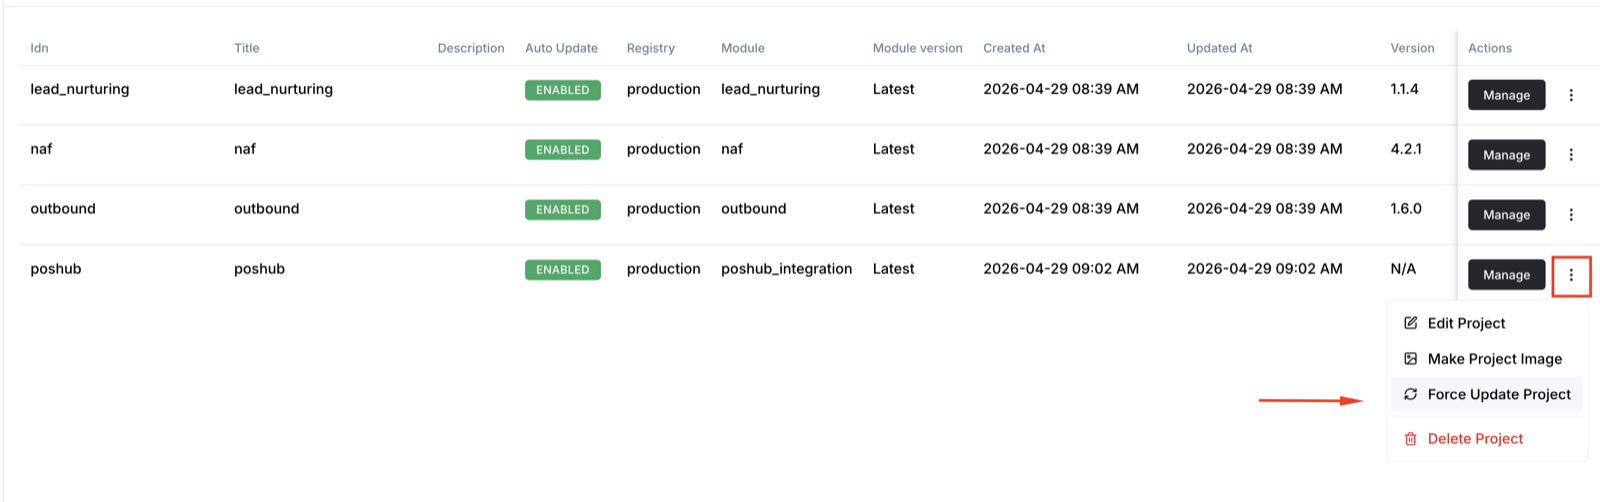
Newo creates the project and shows it in your list. Click Manage (or the ⋮ menu → Edit Project) to open it. The screenshot below also shows where to find Force Update Project if you ever need to refresh to the latest module version.
Step 4 — Open the project settings
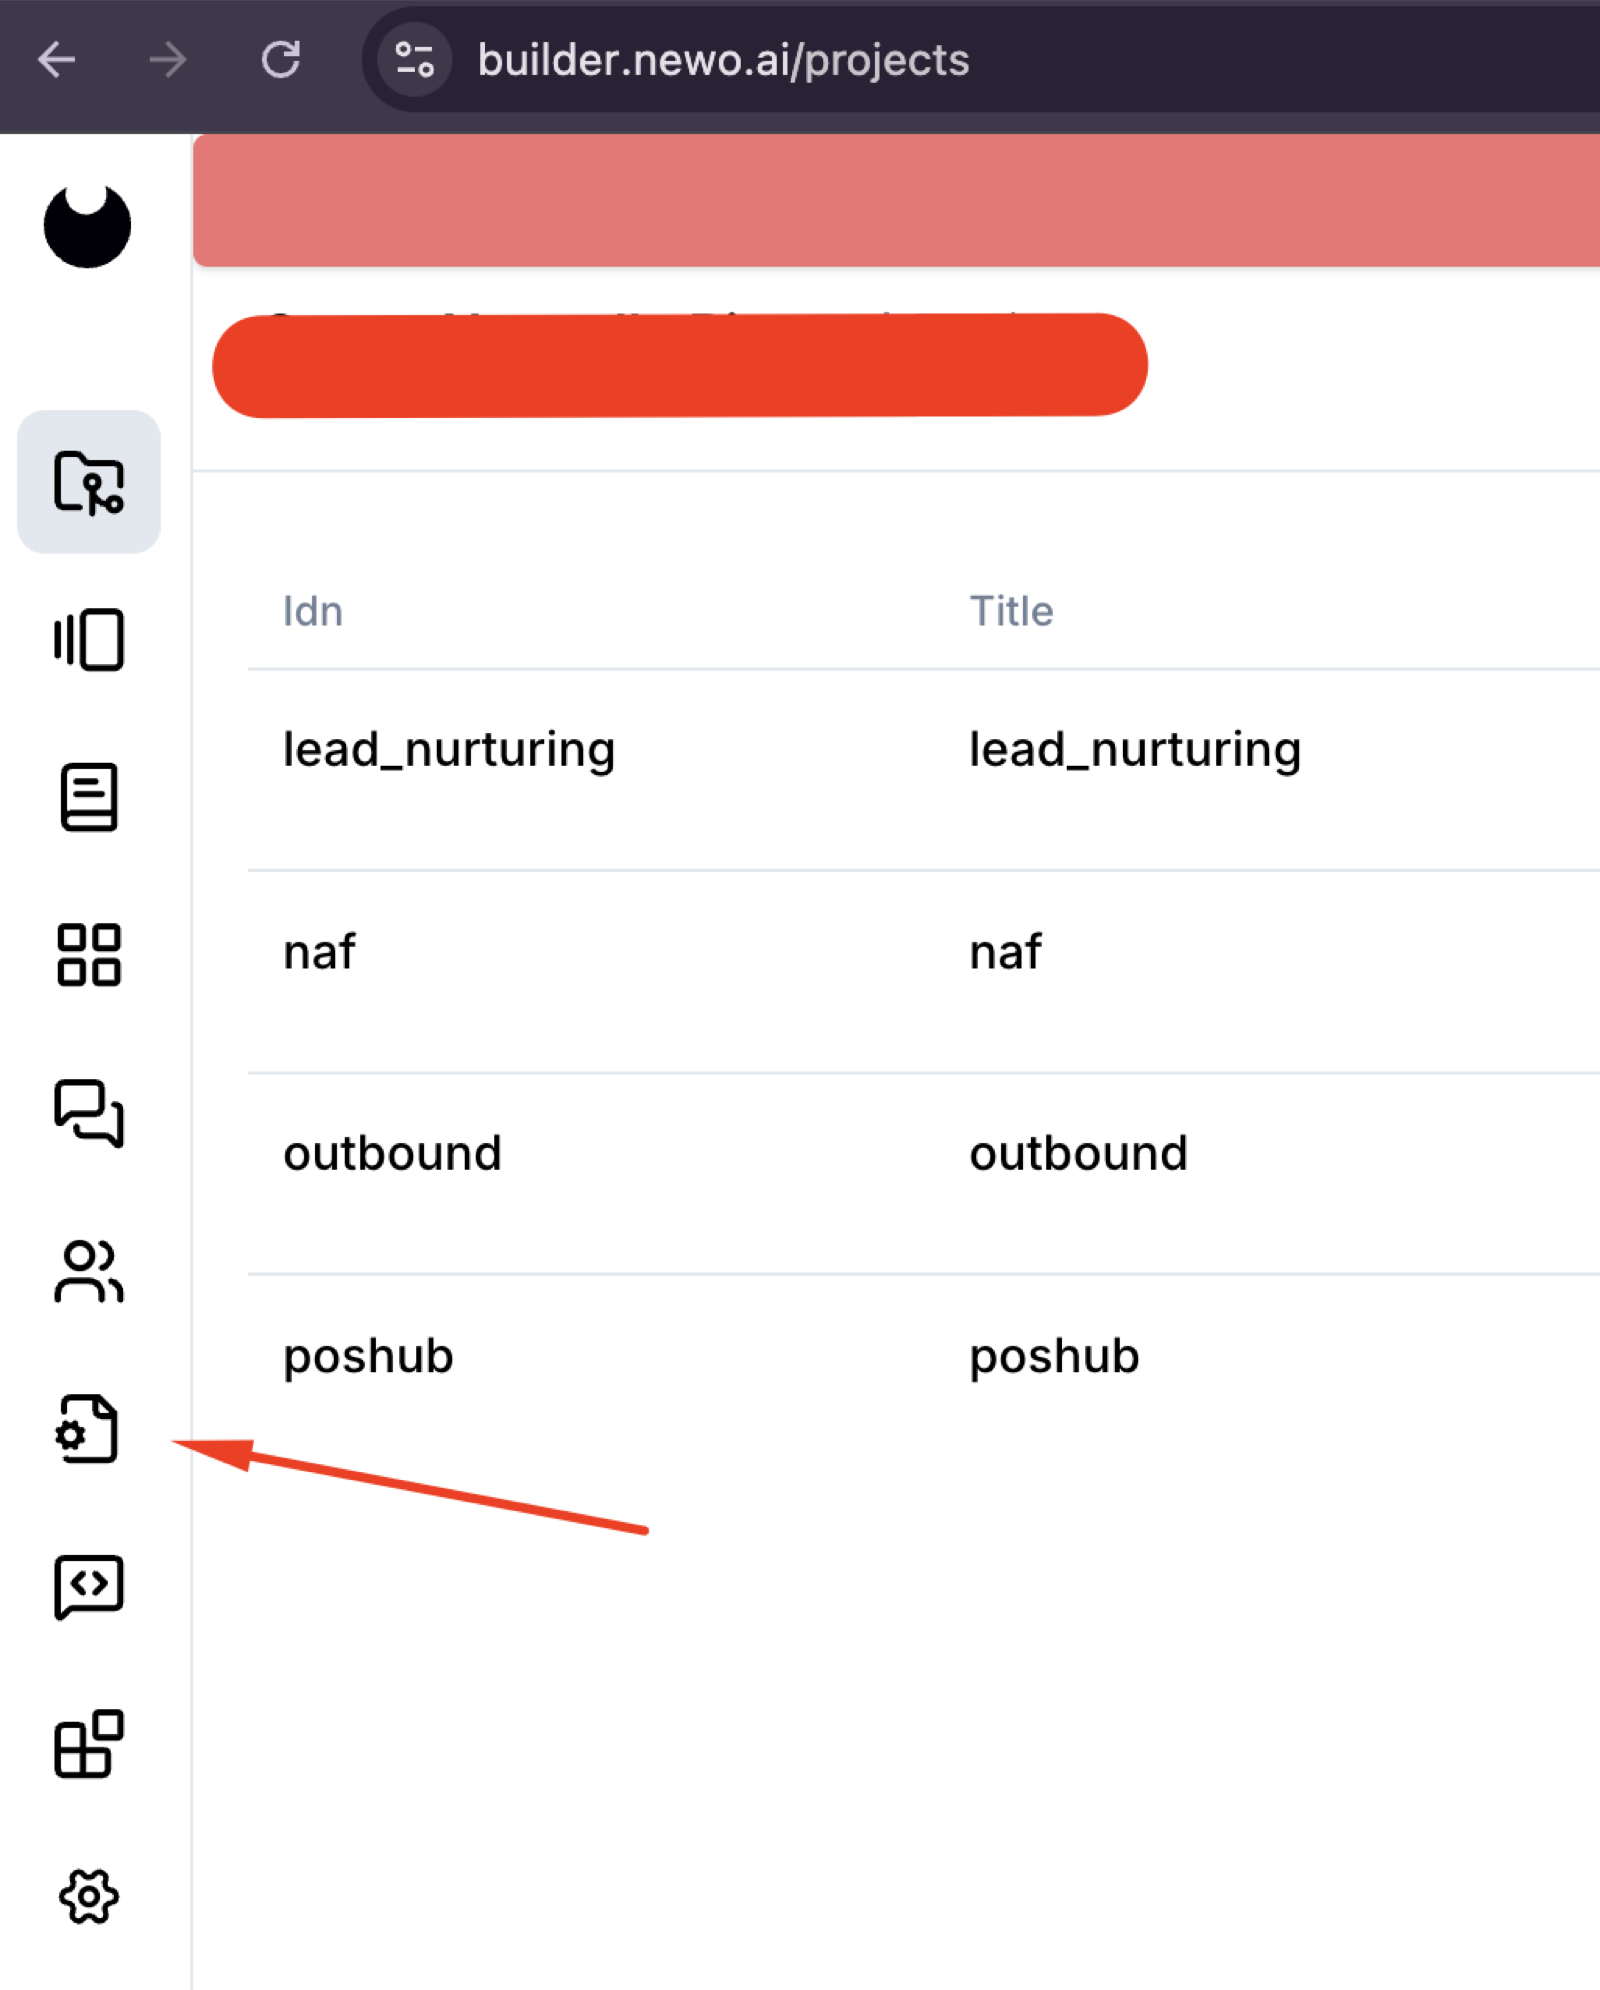
Inside the project, click the Settings (gear-on-document) icon in the left sidebar.
Step 5 — Open the PosHUB Settings group
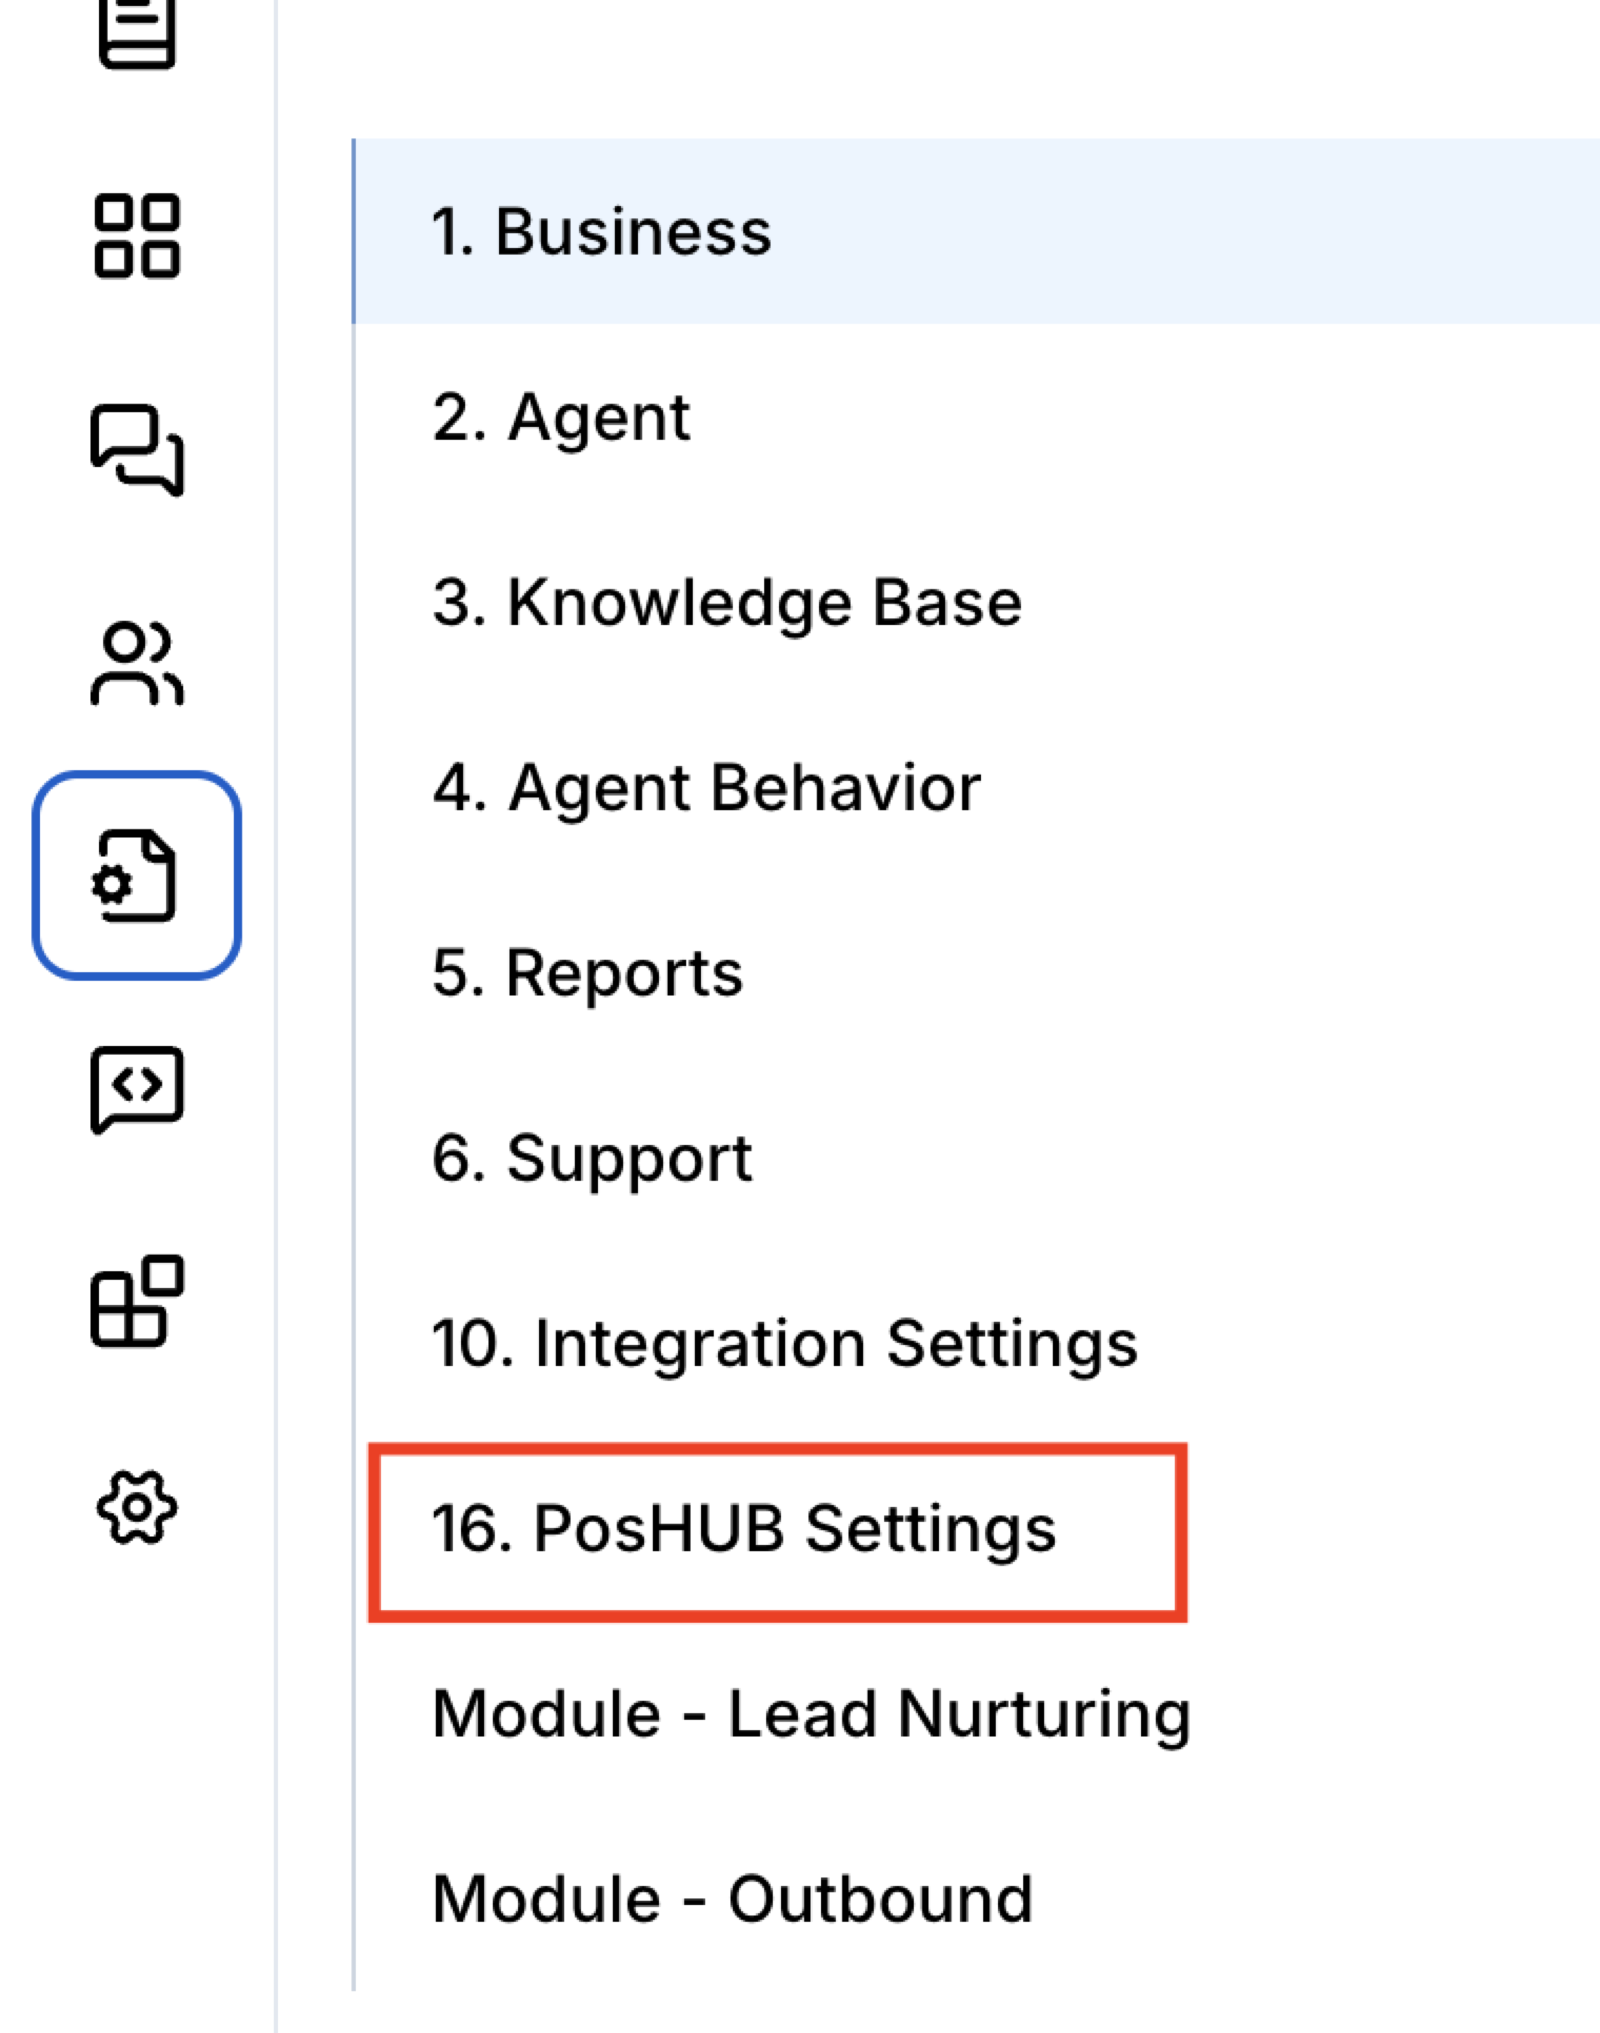
In the settings list, click 16. PosHUB Settings.
Version note. On newer module versions, the same group may appear as Module - PoshubIntegration. The fields are the same; only the settings-group label changed.
Step 6 — Paste the admin credentials and run Publish All
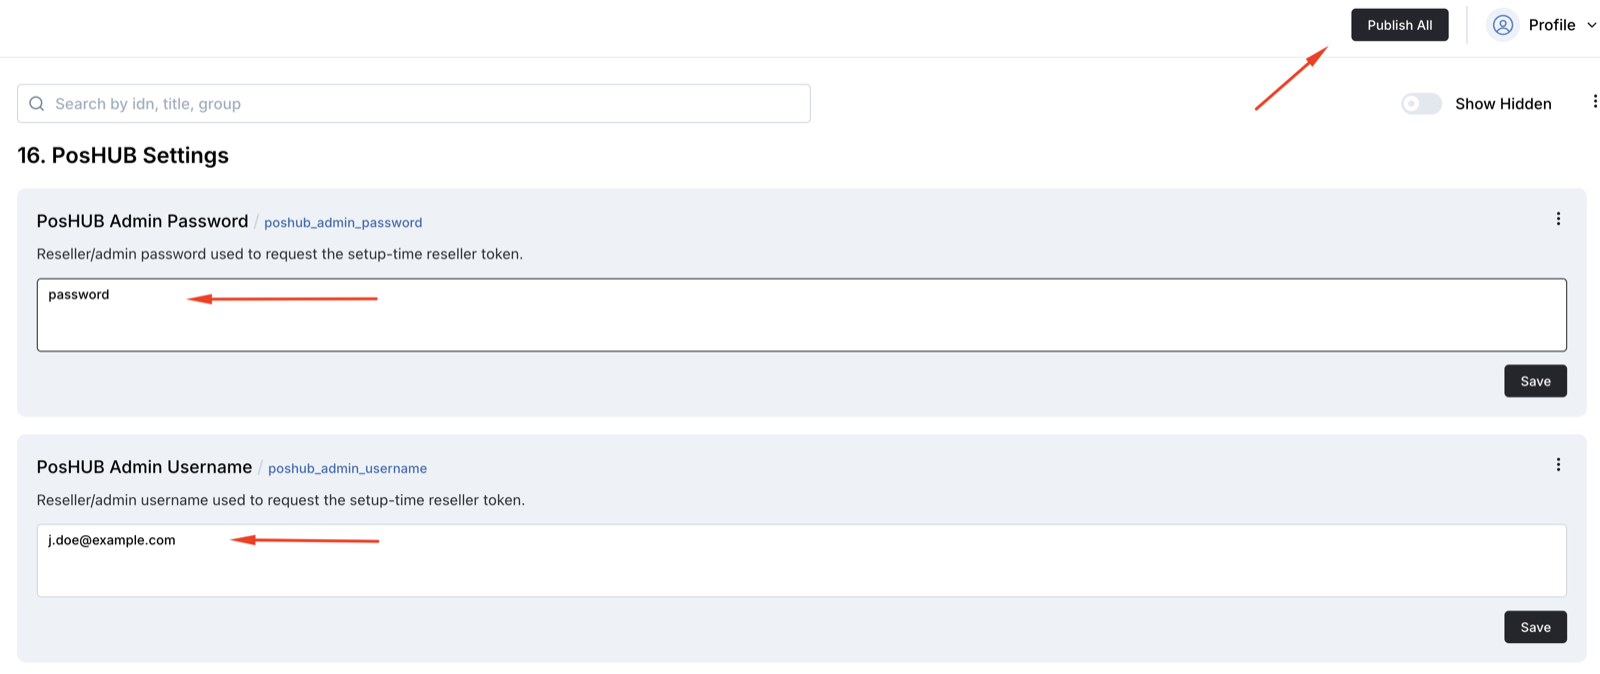
You only need two values for the first publish — the integration uses them to discover your reseller account and to generate the webhook URLs:
- PosHUB Admin Username — the reseller-admin user (email) PosHUB issued to you.
- PosHUB Admin Password — the matching password.
- Click Save under each field.
- Click Publish All at the top-right.
Leave PosHUB Client ID, PosHUB Client Secret, PosHUB Reseller ID, and PosHUB Location empty for now — you will fill them in later. Leave Setup Canvas Scenarios on the default (on) so the integration installs the order intents into your canvas.
Staging note. If your application is on the PosHUB staging environment, ask the PosHUB team to confirm the password grant is enabled for it — the integration's setup phase requires it and will otherwise fail with an authentication error.
Step 7 — Wait for the webhook URLs to appear
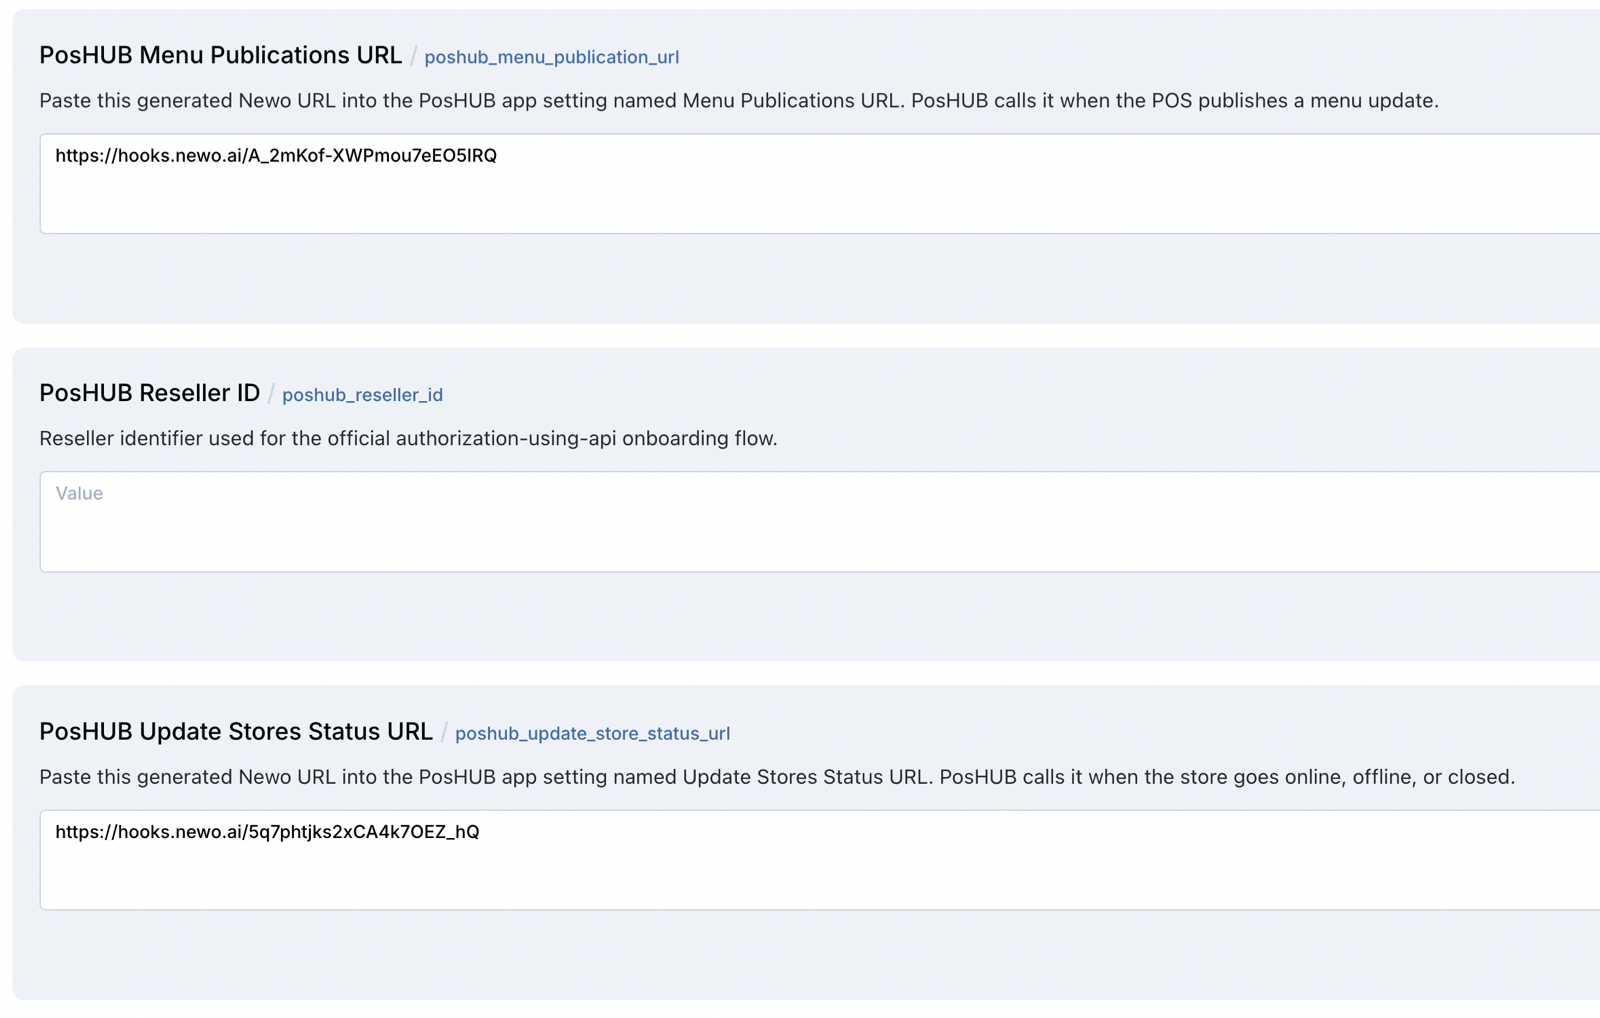
After Publish All finishes, scroll down in the PosHUB Settings group. The integration has generated two webhook URLs and written them into:
- PosHUB Menu Publications URL — looks like
https://hooks.newo.ai/A_2mKof-XWPmou7eEO5IRQ - PosHUB Update Stores Status URL — looks like
https://hooks.newo.ai/5q7phtjks2xCA4k7OEZ_hQ
These two settings are intentionally read-only — the URL is generated by Newo and only PosHUB needs the value.
Step 8 — Open the Developer area in PosHUB
Sign in to your PosHUB Reseller account at tryposhub.com, open the user menu in the top-right of the dashboard, and click Developer.
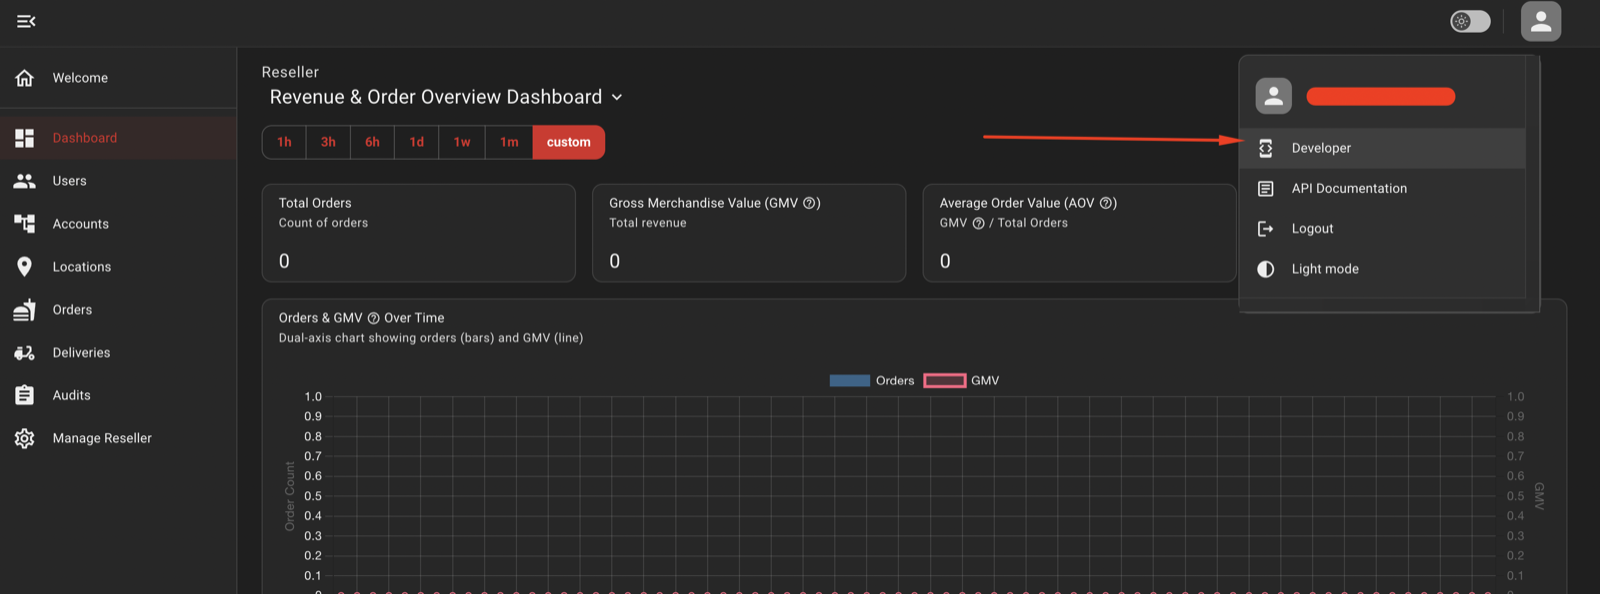
If you do not have a reseller / developer account yet, ask the PosHUB team in the
#poshub_newo_partnerSlack channel to provision one.
Step 9 — Start the New Application wizard
On the Developer Applications page, click New Application in the top-right. PosHUB walks you through a four-step wizard.

Step 10 — Wizard 1/4: Choose Marketplace
In Step 1 — Choose Category, select Marketplace. This is the category that includes the Receive Menu, Create Orders, and Receive Status Updates capabilities the agent uses.
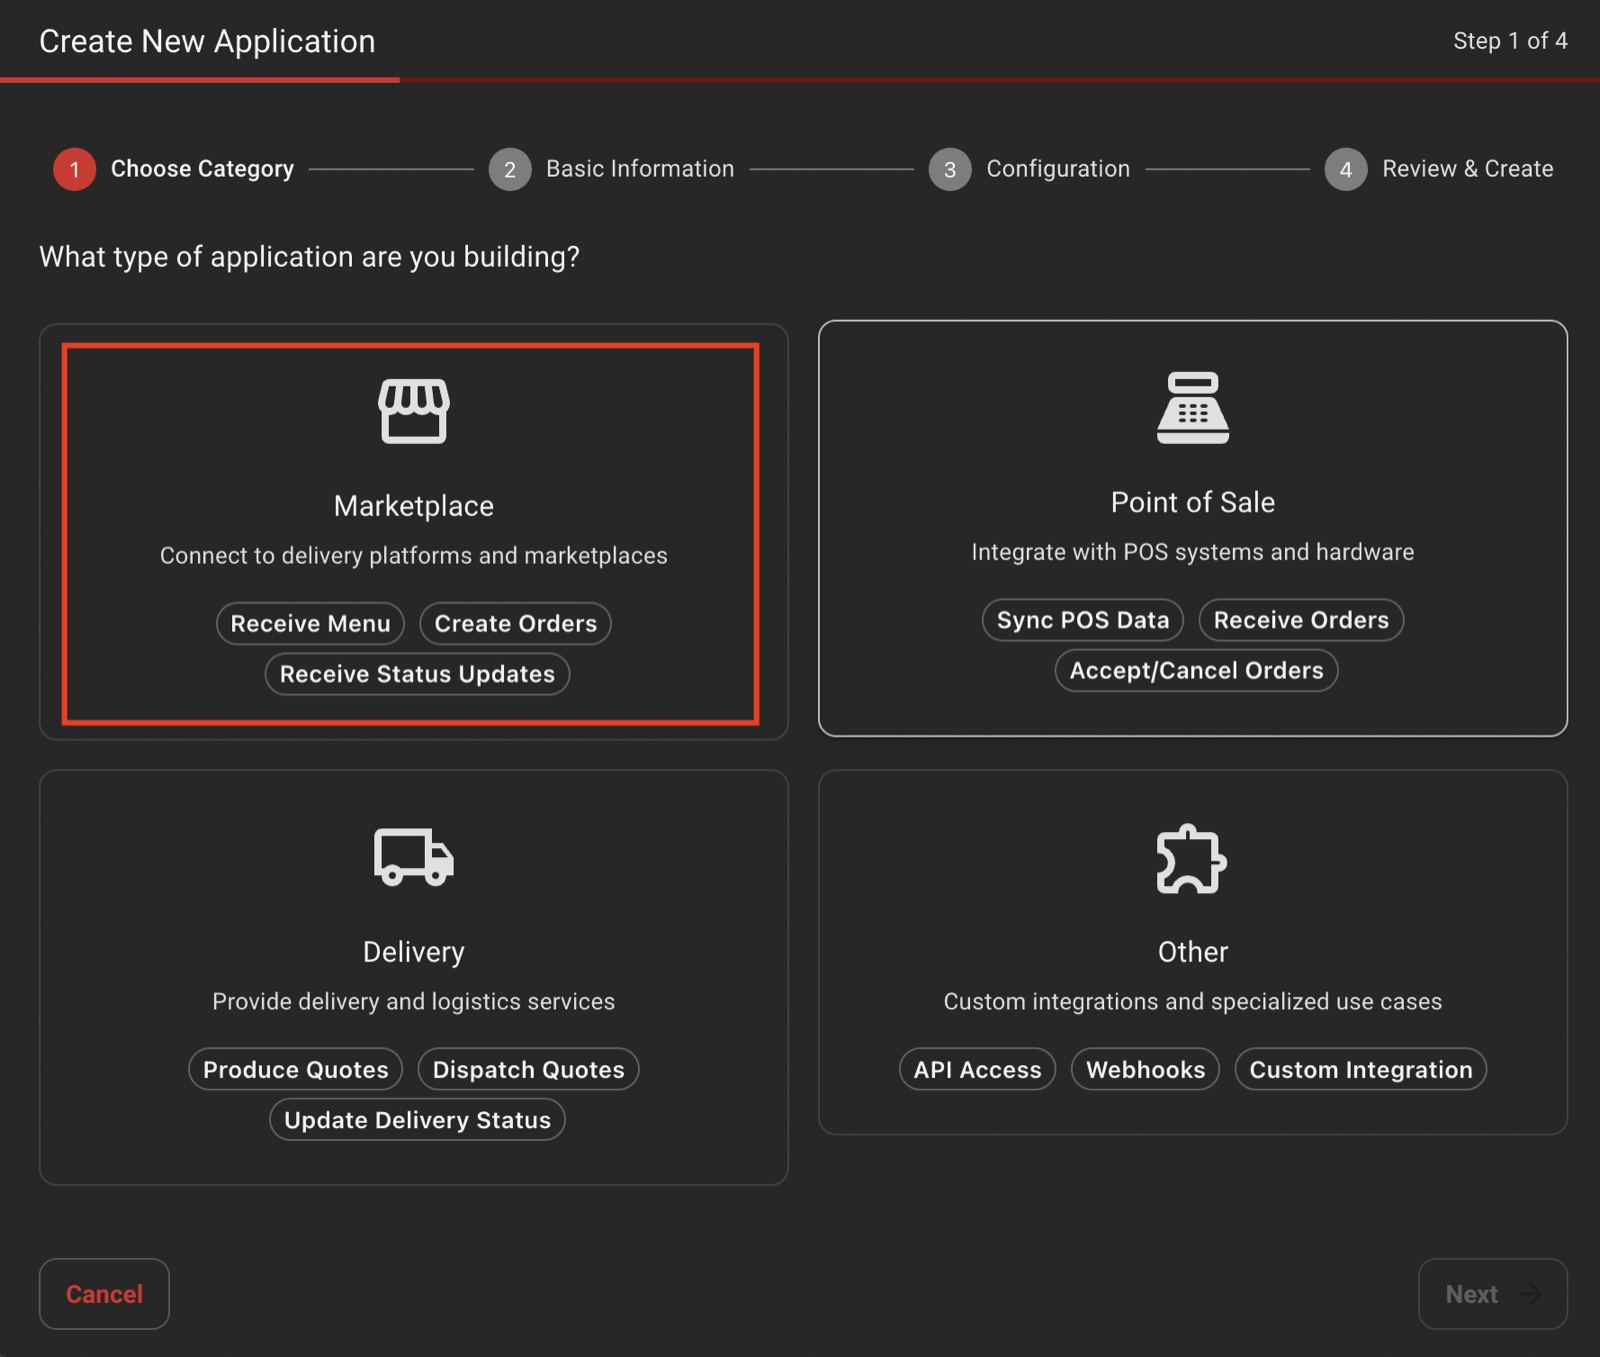
Step 11 — Wizard 2/4: Basic Information
Give the application a descriptive Application Name (for example, NewoAgent) and a Description (for example, Private App For Newo Agent) so you can recognize it later in the Applications list. Click Next.
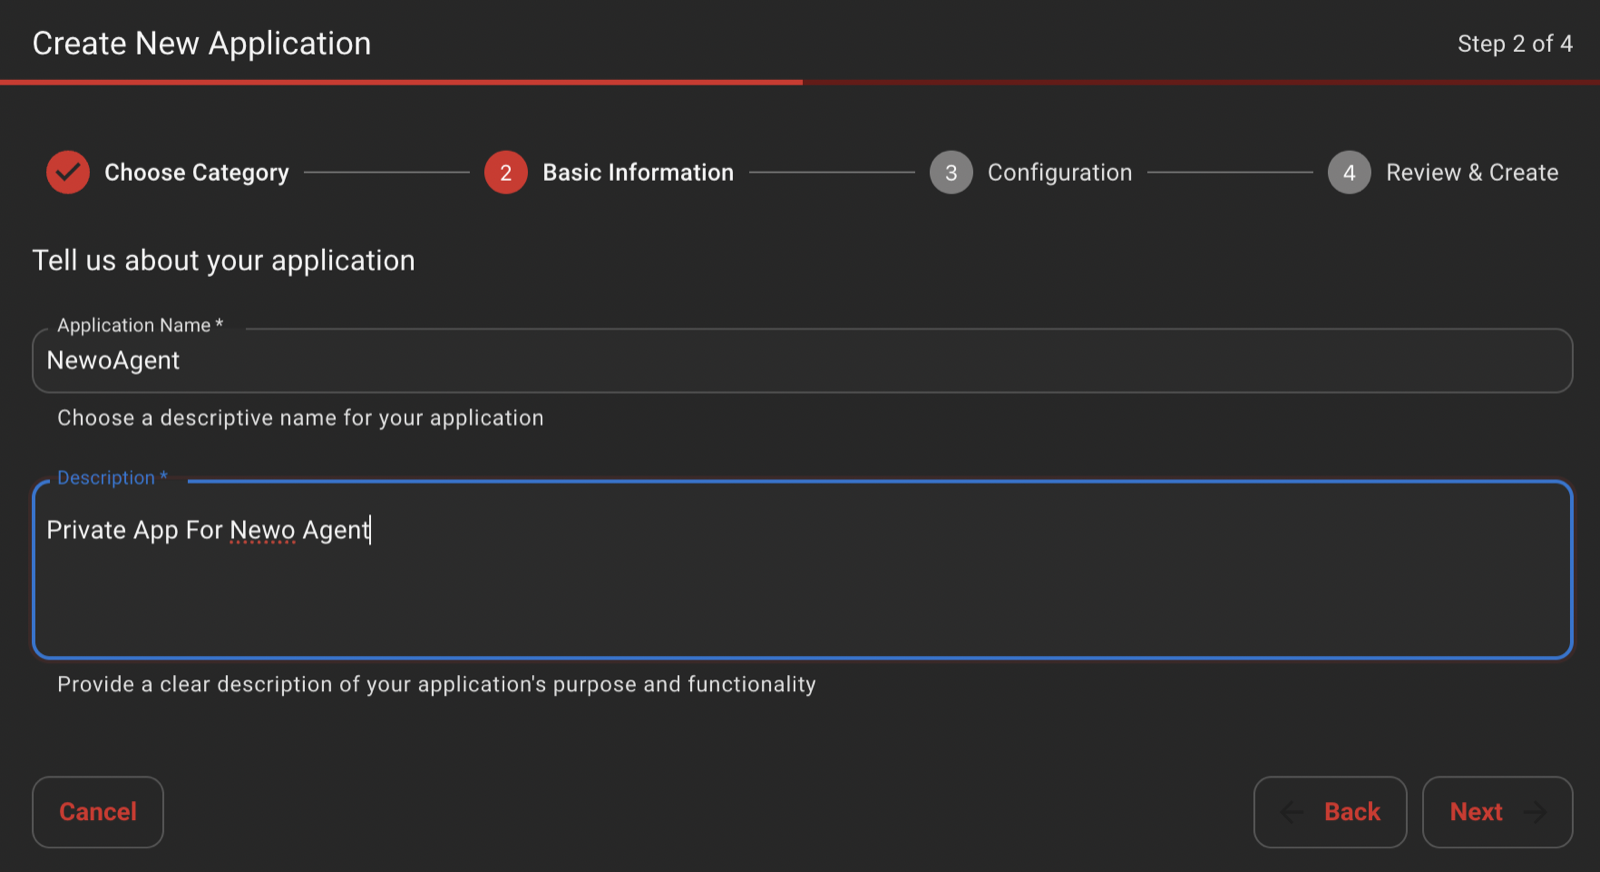
Step 12 — Copy the webhook URLs from Newo
Switch back to Newo Builder and copy the two URL values out of the PosHUB Menu Publications URL and PosHUB Update Stores Status URL fields you saw in Step 7. Click each value to select it, then copy.
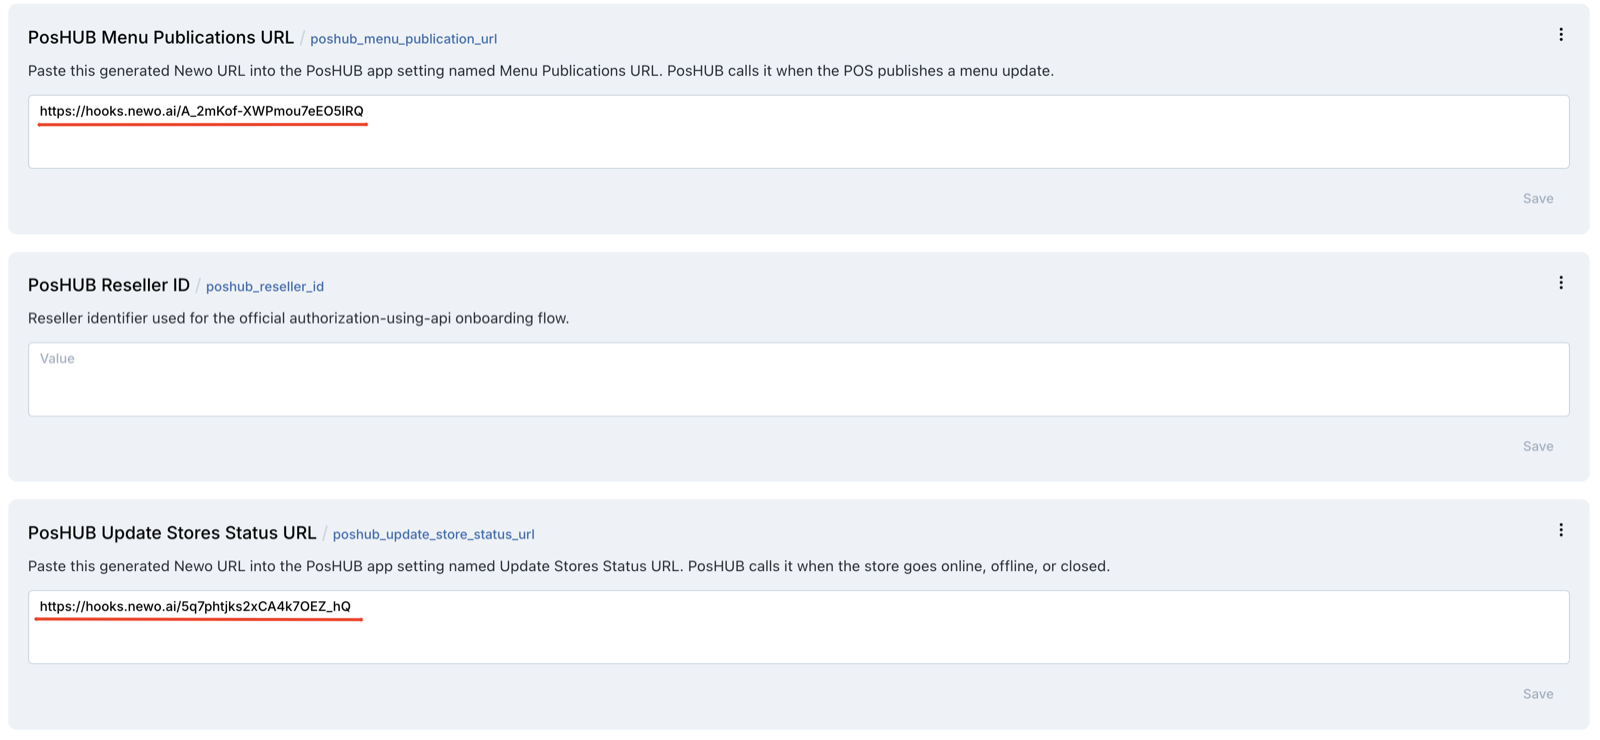
Step 13 — Wizard 3/4: Configuration (paste the webhook URLs)
Switch back to PosHUB. In Step 3 — Configuration, paste:
- the PosHUB Menu Publications URL value into Menu Publication URL;
- the PosHUB Update Stores Status URL value into Store Status Update URL.
Both URLs must use HTTPS in production. Click Next.
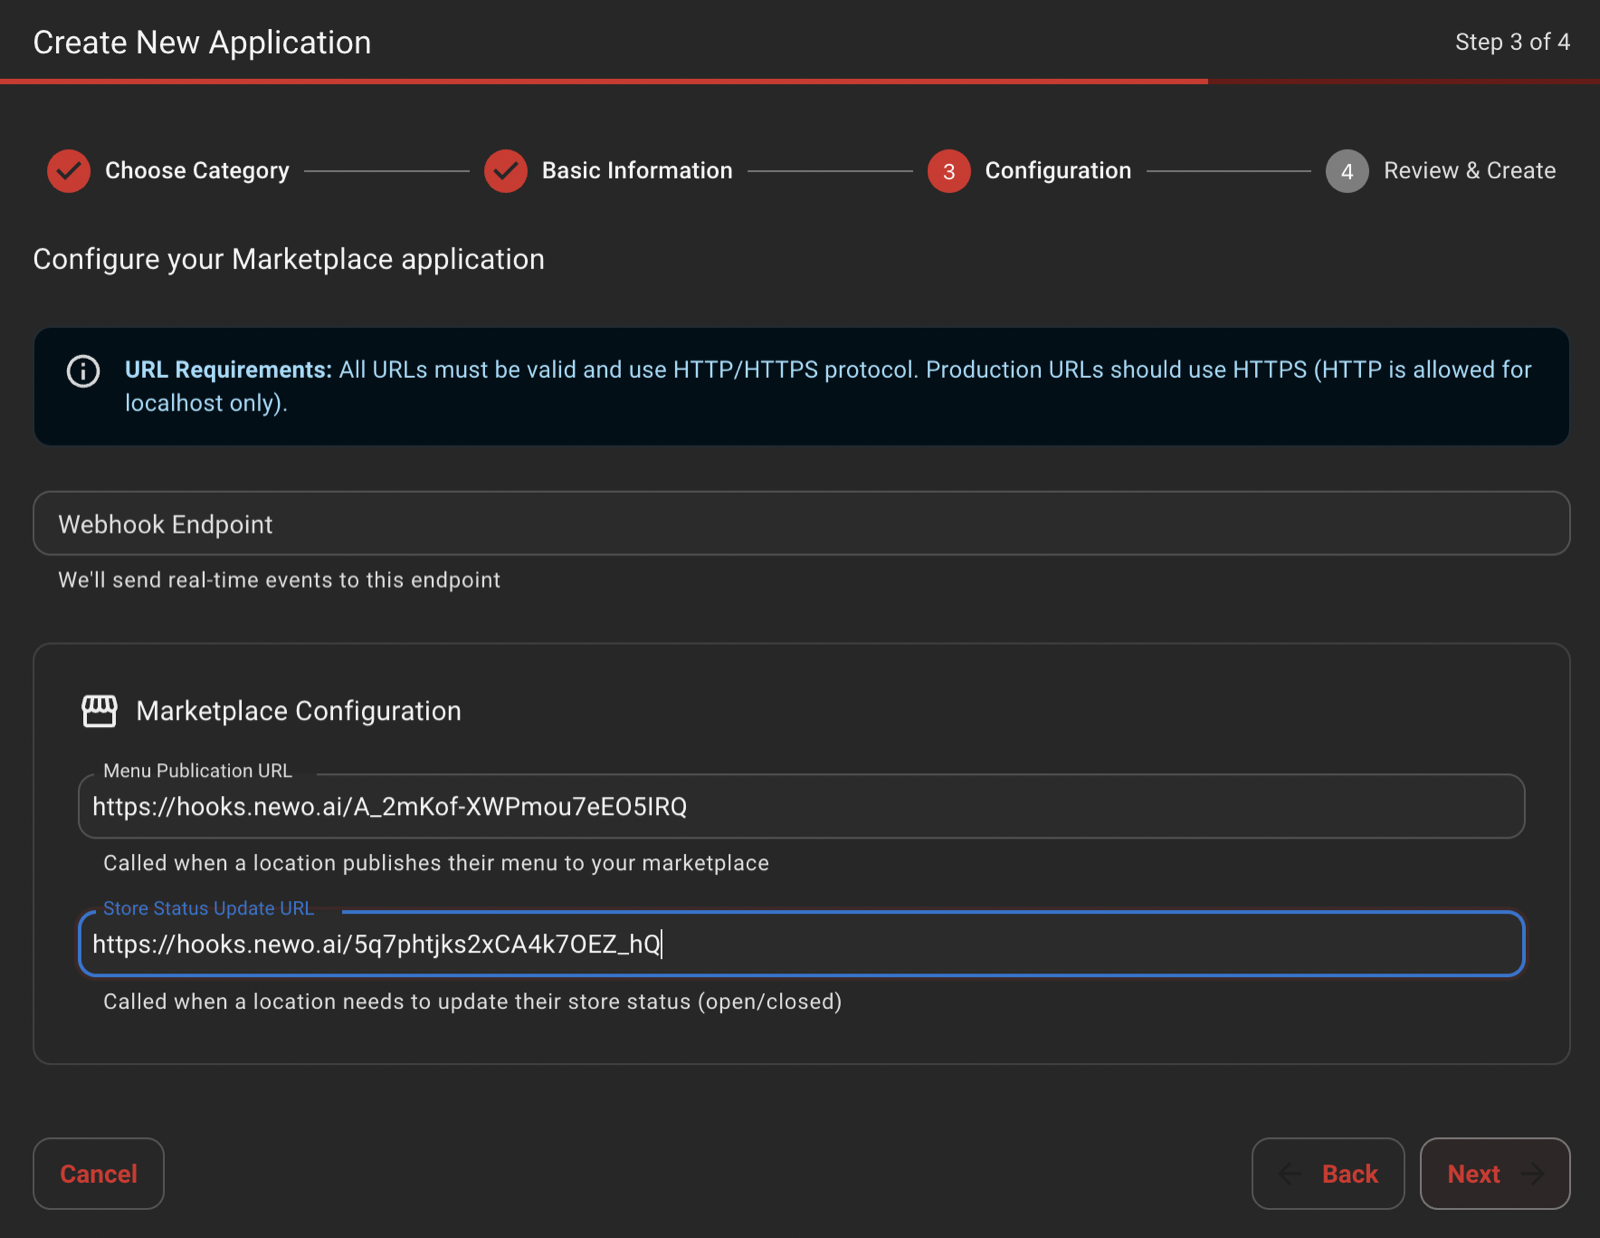
Scopes. The wizard preselects the OAuth scopes the integration needs. Confirm the Configuration step keeps all of them enabled — the agent relies on each one, and onboarding will fail if any is unchecked:
orders.read,orders.write,menus.read,menus.write,locations.read,locations.write,locations.sync,connections.read,connections.write,applications.read,accounts.read,accounts.write,users.read,users.write,resellers.read,provisioning.
Step 14 — Wizard 4/4: Review & Create
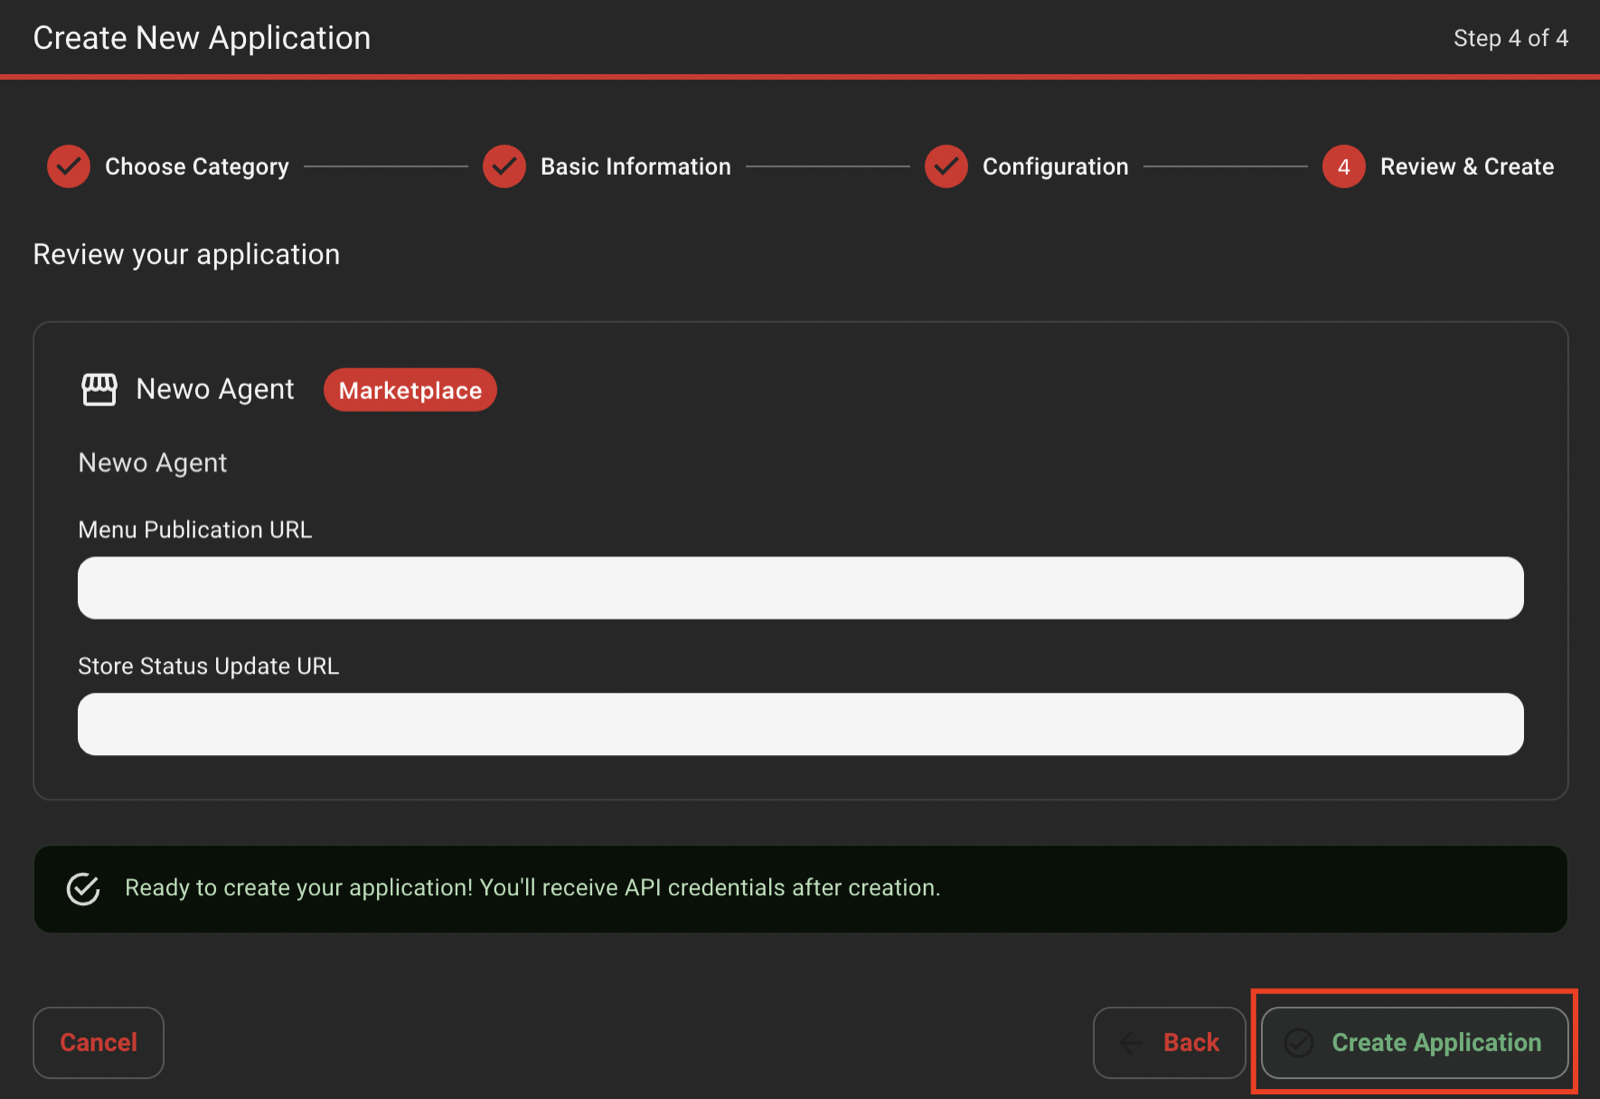
In Step 4 — Review & Create, double-check the application name, the Marketplace badge, and that both webhook URLs are listed. Click Create Application.
Step 15 — Copy the Client ID and Client Secret
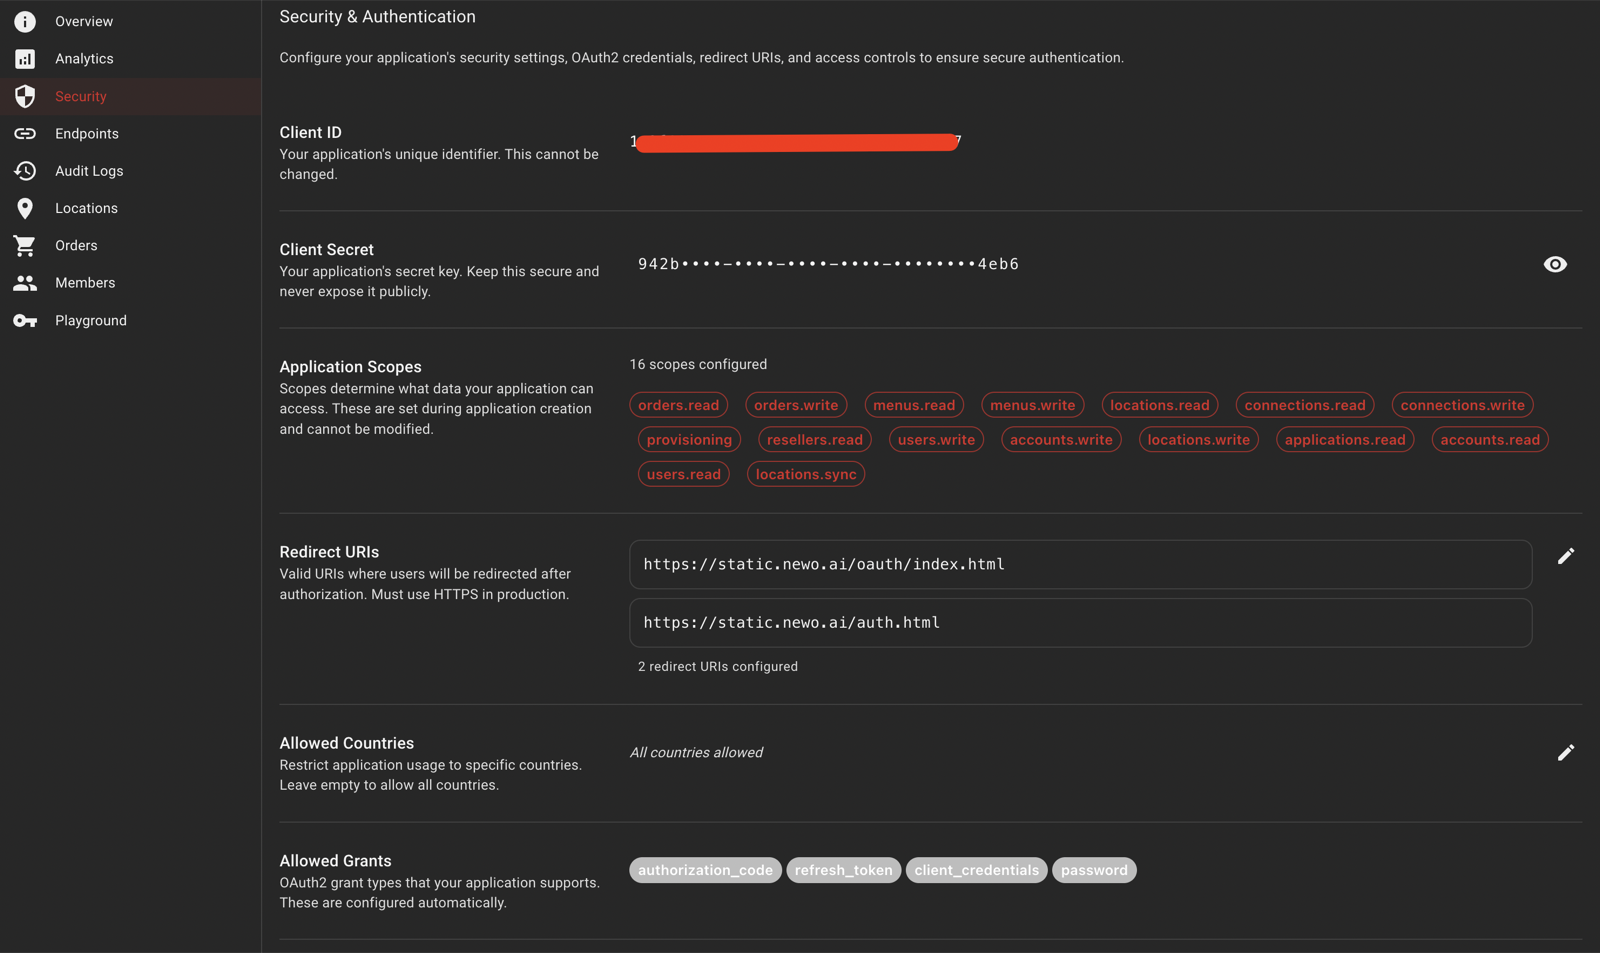
PosHUB now shows the Security & Authentication page for the new application. Copy:
- the full Client ID value;
- the full Client Secret value (PosHUB usually does not let you re-display the secret after the first time — copy it now).
The same page also shows the configured Application Scopes, the Redirect URIs, and the Allowed Grants (authorization_code, refresh_token, client_credentials, password).
Step 16 — Paste Client ID and Client Secret in Newo
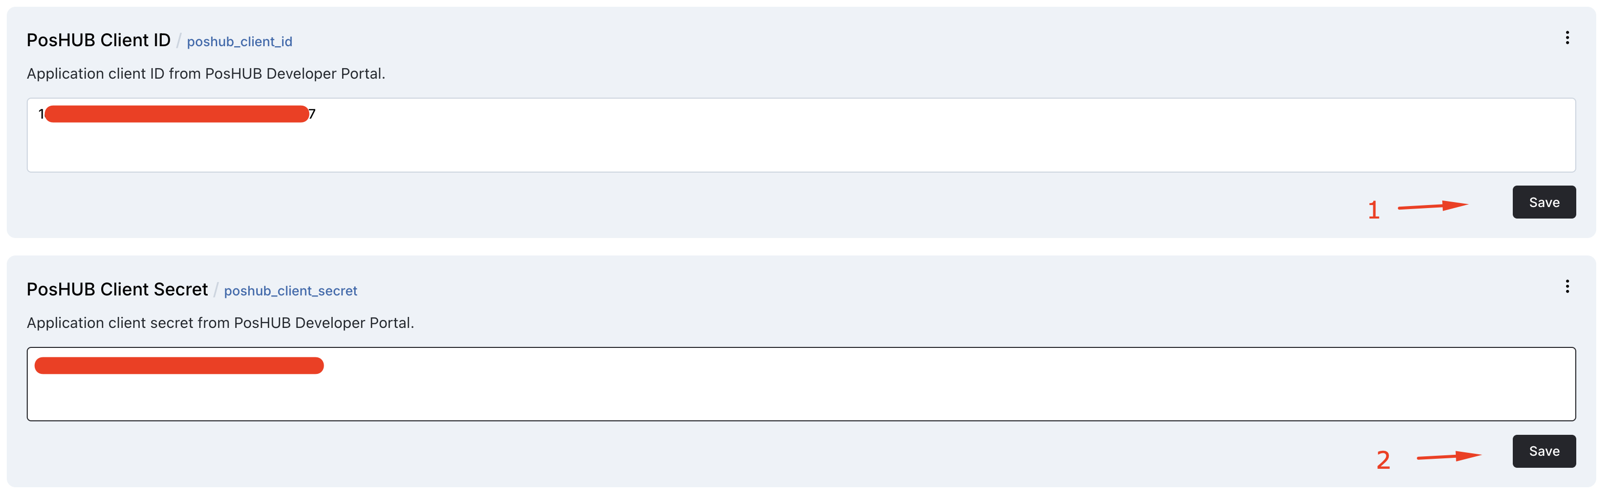
Back in Newo Builder → PosHUB Settings:
- Paste the value into PosHUB Client ID → Save.
- Paste the value into PosHUB Client Secret → Save.
Step 17 — Find your Reseller ID in the PosHUB URL
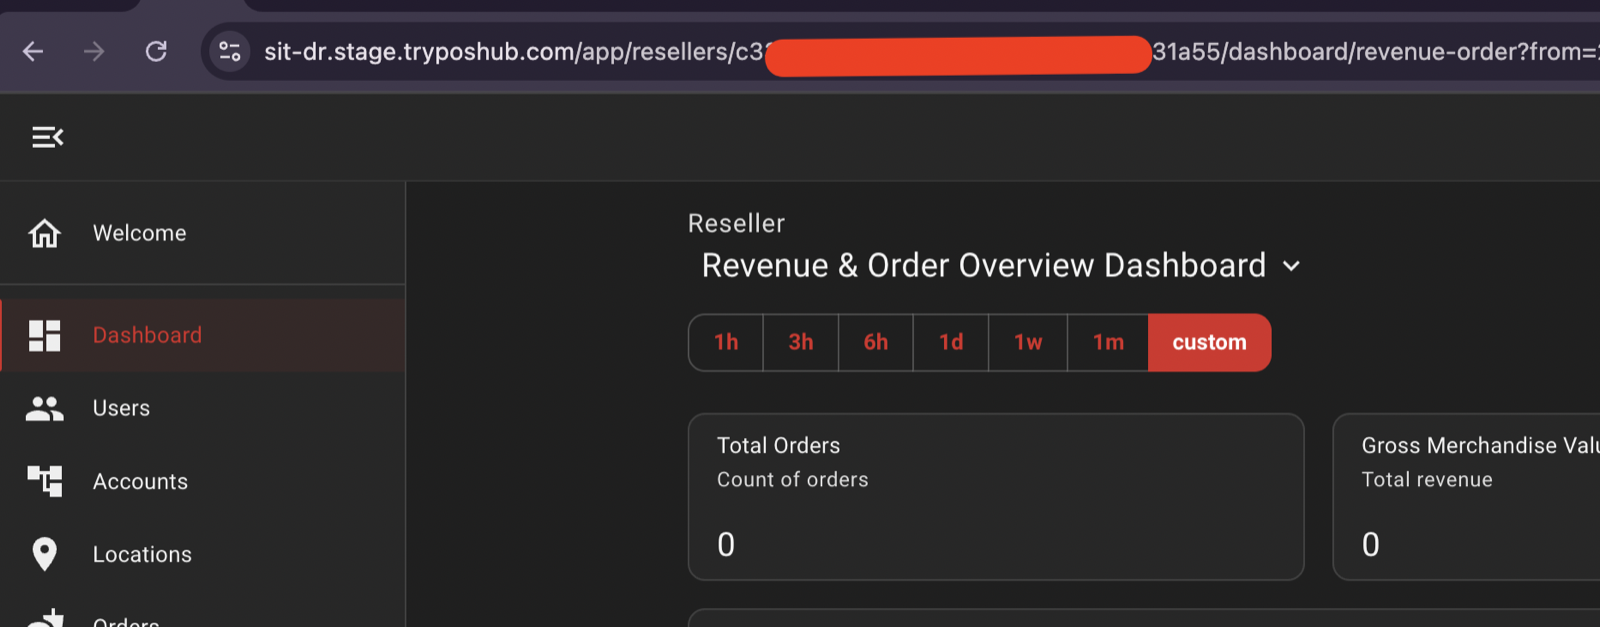
While you are still signed into PosHUB, look at the browser address bar on any page inside the reseller dashboard. The URL contains your Reseller ID:
https://sit-dr.stage.tryposhub.com/app/resellers/<RESELLER_ID>/dashboard/...
Copy the <RESELLER_ID> portion. If you have multiple reseller IDs, pick the one that owns the PosHUB locations this agent should serve.
Tip. The Reseller ID is the long alphanumeric string between
/app/resellers/and/dashboard/.
Step 18 — Paste the Reseller ID and run Publish All one more time
Back in Newo Builder → PosHUB Settings:
- Paste the value into PosHUB Reseller ID → Save.
- (Optional) If you are still on staging, set PosHUB Base URL to the staging URL the PosHUB team gave you. Once your application is certified, switch it to the production URL
https://api.tryposhub.com. - Click Publish All again.

Step 19 — Pick your PosHUB Location and Publish All for the last time
The second Publish All finishes the auto-setup pipeline:
- requests a setup-time admin token using your reseller credentials and exchanges it for a runtime token cache;
- discovers your accounts, applications, and active connection automatically and stores their identifiers in hidden settings;
- populates the PosHUB Location dropdown with every location PosHUB returned for your reseller.
Open the PosHUB Location dropdown, pick the location this agent should serve, click Save, then click Publish All one final time so the integration loads the menu for that location and:
- pulls the menu for the chosen location and stores it as the synchronized menu the agent reads from during conversations;
- registers the trigger phrases the agent must say before placing, checking, or cancelling an order;
- (when Setup Canvas Scenarios is on) publishes the PosHUB order intents and scenarios into your canvas library, leaving any existing customizations alone.
The visible dropdown now shows values in the format Location Name (location_id) so operators can distinguish similar restaurant names. Newo stores the raw UUID separately in hidden settings — you do not need to paste or edit the raw location id by hand.
How to verify everything is wired up:
- ✅ The PosHUB Location dropdown is populated with values from your PosHUB account (was empty before).
- ✅ The PosHUB Menu Publications URL and PosHUB Update Stores Status URL fields are populated with
https://hooks.newo.ai/...URLs and PosHUB's wizard accepted them in Step 13. - ✅ The intents listed in the Scenarios section appear in your canvas library.
- ✅ A test chat that says "I'd like to place an order" prompts the agent to start gathering items.
If any of those checks fails, jump to Common errors and recovery below.
How to test that everything works
Before going live, run through this checklist with a demo customer phone number on a non-production location (or during a quiet window).
Test order placement
- Start a test chat or call session.
- Say something like "Can I place an order?". The agent should accept and start asking about items.
- Pick one item that you know exists in the PosHUB menu — including any required modifier. The agent should reuse the exact item name from the menu, not paraphrase it.
If the PosHUB menu contains awkward or duplicated wording such as
Vanilla Milkshake Milkshakes, that exact wording should still be preserved in the submitted order payload. - Provide a first name, last name, and phone number when asked. Email is optional — the agent should not block the order if you skip it.
- Confirm the final summary. The agent should say "I will place your order right now and come back with the confirmation." and then come back with a real PosHUB order id.
- Open the PosHUB console and confirm the order shows up under the same location, with the correct items, modifiers, and customer name.
Test order status lookup
- Use an order id you just placed in the previous test.
- Say "Can you check the status of my order?" and provide the order id when asked.
- The agent should say "I will check your order status right now and come back with the details." and then read back the current status.
- Cross-check the status with what the PosHUB console shows for the same order.
Test order cancellation
- Place a fresh test order so you have one in a cancellable state.
- Say "I'd like to cancel that order" and confirm when the agent restates the target.
- The agent should say "I will cancel your order right now and come back with the confirmation." and then confirm the cancellation.
- The PosHUB console should show the order as cancelled.
Test the store-offline path
- Toggle the location offline in PosHUB (or wait until your normal closed hours).
- Try to place an order through the agent. The agent should apologize and either transfer the call (working hours) or take a message for the manager (off hours) — never claim the order succeeded.
Scenarios
What gets added on Publish All
When Setup Canvas Scenarios is on, Publish All adds these intent / scenario pairs to your canvas library:
| Intent (canvas label) | Scenario (canvas title) |
|---|---|
| Food Order via Agent | Create PosHUB Order via Agent |
| Check Food Order Status | Check PosHUB Order Status via Agent |
| Cancel Food Order | Cancel PosHUB Order via Agent |
These are a reference implementation. Once they are on your canvas, you can edit them in Newo Builder like any other intent or scenario — change wording, reorder steps, add cases.
Heads up — future updates do not overwrite your edits. Once an intent or scenario from this integration is on your canvas, later integration updates will leave your edited copy alone. To pick up newer shipped defaults, delete the edited copy from your canvas and run Publish All again — the integration only re-publishes intents and scenarios that are missing.
Why trigger phrases matter
Each scenario contains one short sentence — the trigger phrase — that the agent must say verbatim for the corresponding action to fire. The agent is gated on the exact wording: if you reword the trigger phrase, the action stops working. Always preserve the trigger phrases as written below.
Scenario 5 — Create PosHUB Order via Agent
Steps:
- Identify order intent. Confirm the customer wants to place a PosHUB food order.
- Build the order from the synchronized menu knowledge. Use only items, modifiers, sizes, and prices that come from the Synchronized menu knowledge panel. Never invent menu content. If the customer asks for something not on the menu, apologize, ask a clarifying question, or offer alternatives. Repeat until the customer confirms there are no more items.
- Gather or reconfirm customer identity and fulfillment details. Collect first name, last name, and phone number through the standard procedures. Email is optional. Confirm the fulfillment type (use PICKUP unless the customer explicitly asks for delivery), pickup/delivery timing (specific time or ASAP), and any order-level special instructions. For delivery, collect the full address, door or house number, postcode, and delivery instructions or explicit none.
- Reconfirm the final order summary. Restate every item, quantity, modifier, special instruction, fulfillment type, fulfillment timing, and the customer's name and phone number. For delivery, also restate the delivery address and delivery instructions. Proceed only after the customer confirms.
- Submit the order. The agent says verbatim: "I will place your order right now and come back with the confirmation." and then waits for the result to appear in the Action results panel before saying anything else about the order.
- Handle the system result.
- On success — confirm the order, mention the order id and current status if available, then finish the conversation.
- If PosHUB asks for a missing required modifier or rejects an unavailable item — explain exactly what is missing or unavailable, gather only the needed correction, update the summary against the Synchronized menu knowledge panel, and resubmit.
- If the store is offline, closed, or PosHUB returned a technical failure — apologize and either transfer the call (working hours) or relay a message to the manager (off hours).
- Finish the conversation.
Triggered by intent: Food Order via Agent.
Trigger phrases (do not edit):
- "I will place your order right now and come back with the confirmation."
What the agent reads to know the result:
- Synchronized menu knowledge panel — the live snapshot of items, modifiers, sizes, and prices for the chosen PosHUB Location. The agent uses it to answer menu questions and to build the order.
- Runtime narrowed menu section — on current module versions, the menu panel is injected internally as
PosHUBMenuInfo role="context"and usually contains only the categories relevant to the current turn, with automatic fallback to the full synchronized snapshot if needed. - Action results panel — the outcome of the most recent order submission, written by PosHUB. The agent paraphrases it to the customer.
Safe customization (edit in the canvas UI):
- ✅ Reword the way the agent asks for items, modifiers, customer name, or fulfillment type.
- ✅ Add an upsell question between item collection and the summary step.
- ✅ Change how the agent phrases the success or failure message back to the customer.
- ✅ Add an extra clarifying question if your menu has unusual structure.
- ❌ Reword, translate, or remove the trigger phrase: "I will place your order right now and come back with the confirmation." — the order will stop firing.
- ❌ Skip the menu-grounding rule. The agent must build the order from the Synchronized menu knowledge panel, never from memory or invention.
- ❌ Submit the order before the customer confirms the final summary.
Scenario 6 — Check PosHUB Order Status via Agent
Steps:
- Identify which order should be checked. Use existing order context if any; otherwise ask the customer for an order id or a customer-friendly order reference.
- Reconfirm the lookup target. Restate which order is about to be checked and proceed only after the customer confirms.
- Check the order status. The agent says verbatim: "I will check your order status right now and come back with the details." and waits for the result to appear in the Action results panel.
- Handle the result.
- On success — read back the status exactly as PosHUB returned it, mention the order id, then finish.
- If no order can be determined — explain and ask for the order id; if the customer still cannot provide enough data, hand off to a human.
- If the lookup fails for a technical reason — apologize and either transfer the call (working hours) or relay a message to the manager (off hours).
- Finish the conversation.
Triggered by intent: Check Food Order Status.
Trigger phrases (do not edit):
- "I will check your order status right now and come back with the details."
What the agent reads to know the result:
- Action results panel — the status payload PosHUB returned for the specific order id.
Safe customization (edit in the canvas UI):
- ✅ Reword how the agent asks for the order id or how it presents the status back.
- ✅ Add a follow-up question after the status (e.g. asking whether the customer needs anything else).
- ❌ Reword or remove the trigger phrase: "I will check your order status right now and come back with the details." — the lookup will stop firing.
- ❌ Present a status before the Action results panel is populated.
Scenario 7 — Cancel PosHUB Order via Agent
Steps:
- Identify which order should be cancelled. Use existing order context if any; otherwise ask the customer for an order id or a customer-friendly order reference.
- Reconfirm the cancellation target. Restate which order is about to be cancelled and ask for final confirmation. If the customer changes their mind, do not cancel — finish the conversation politely.
- Cancel the order. The agent says verbatim: "I will cancel your order right now and come back with the confirmation." and waits for the result to appear in the Action results panel.
- Handle the result.
- On success — confirm the cancellation, mention the order id, then finish.
- If no order can be determined — explain and ask for the order id; if the customer still cannot provide enough data, hand off to a human.
- If the cancellation fails for a technical reason or PosHUB rejects it — apologize and either transfer the call (working hours) or relay a message to the manager (off hours).
- Finish the conversation.
Triggered by intent: Cancel Food Order.
Trigger phrases (do not edit):
- "I will cancel your order right now and come back with the confirmation."
What the agent reads to know the result:
- Action results panel — the cancellation outcome PosHUB returned (success, rejection, or technical failure).
Safe customization (edit in the canvas UI):
- ✅ Reword how the agent confirms the target order or the final cancellation message.
- ✅ Add a "are you sure" warning if your business has a no-refund window.
- ❌ Reword or remove the trigger phrase: "I will cancel your order right now and come back with the confirmation." — the cancellation will stop firing.
- ❌ Tell the customer the order is cancelled before the Action results panel is populated.
Trigger phrases reference
| Trigger phrase (verbatim) | Fires | Used in |
|---|---|---|
| "I will place your order right now and come back with the confirmation." | Order placement | Create PosHUB Order via Agent |
| "I will check your order status right now and come back with the details." | Order status lookup | Check PosHUB Order Status via Agent |
| "I will cancel your order right now and come back with the confirmation." | Order cancellation | Cancel PosHUB Order via Agent |
Example dialogs
Example 1 — Pickup order, happy path
Customer: "Hi, can I place an order for pickup?" Agent: "Of course — what would you like to order today?" Customer: "A large pepperoni pizza and a Coke." Agent: "Got it. The large pepperoni pizza comes with a required crust choice — thin, hand-tossed, or stuffed?" Customer: "Hand-tossed, please." Agent: "Perfect. Anything else, or shall I close out the order?" Customer: "That's it." Agent: "Could I get your first and last name, and a phone number?" Customer: "Sophia Reyes, 555-010-0123." Agent: "So that's one large pepperoni pizza, hand-tossed crust, and one Coke, for pickup, under Sophia Reyes, 555-010-0123. Shall I place the order?" Customer: "Yes, please." Agent: "I will place your order right now and come back with the confirmation." (short pause) Agent: "Order #A12-3456 is in. Status is received. We'll have it ready for pickup shortly."
Example 2 — Required modifier missing
Customer: "I'll have the chicken sandwich combo." Agent: "The chicken sandwich combo requires a side. Would you like fries, salad, or onion rings?" Customer: "Fries." Agent: "And a drink — Coke, lemonade, or iced tea?" Customer: "Lemonade." (order proceeds normally)
Example 3 — Order status check
Customer: "Where's my order? It's #A12-3456." Agent: "Let me confirm — you want me to check the status of order #A12-3456?" Customer: "Yes." Agent: "I will check your order status right now and come back with the details." (short pause) Agent: "Order #A12-3456 is currently being prepared. It should be ready in a few minutes."
Example 4 — Cancel during quiet hours, store offline
Customer: "Can you cancel order #A12-3456?" Agent: "I'm sorry, our system is offline right now and I can't cancel the order automatically. I'll pass your cancellation request to the manager so they can take care of it as soon as we're back online."
Customizing the agent
You can edit any PosHUB intent or scenario directly in Newo Builder like any other canvas content.
Common safe tweaks:
- Brand voice. Reword how the agent greets the customer, asks about items, or confirms the summary. Keep the trigger phrases untouched — those are the only sentences the platform listens for to fire an action.
- Upsell prompts. Add a "Would you like to add a side or a drink?" step before the summary in Create PosHUB Order via Agent.
- Cancellation guardrails. Add a "Please note that orders accepted by the kitchen may not be cancellable" disclaimer to Cancel PosHUB Order via Agent.
- Default fulfillment. The scenario defaults to PICKUP unless the customer asks for delivery. If your business is delivery-first, reword the prompt to ask the customer their preference up front rather than assuming pickup.
Always preserve these trigger phrases verbatim. They are the only sentences the platform listens for to fire the matching action:
- "I will place your order right now and come back with the confirmation."
- "I will check your order status right now and come back with the details."
- "I will cancel your order right now and come back with the confirmation."
Future integration updates will not overwrite your edits. If you want to pick up newer shipped defaults, delete the edited intent or scenario from your canvas and click Publish All — the integration only re-publishes intents and scenarios that are missing.
FAQ
How does the integration refresh credentials? Will I need to re-paste tokens? The integration manages PosHUB tokens for you using OAuth refresh. As long as the PosHUB Client ID, PosHUB Client Secret, and reseller credentials remain valid, you do not need to do anything. PosHUB rotates the refresh token on every refresh; the integration always stores the latest one. If you change your PosHUB password or revoke a token in the developer portal, come back to Newo Builder, paste the new credential into the matching field, and click Publish All.
What happens if I change the admin password in PosHUB? The next setup discovery call will fail with an authentication error. Update PosHUB Admin Password in Newo Builder and click Publish All — the integration will rebuild its setup token cache on the next pass.
Can the agent take payments through the conversation? No. PosHUB processes payment on its own side as part of the order lifecycle. The agent only places, looks up, and cancels orders.
Can the agent edit the menu? No. The PosHUB menu is read-only from the agent's perspective. Edits happen in PosHUB; the integration picks up the new menu the next time PosHUB publishes one (via the Menu Publications webhook) or when the cache window expires.
Does the agent know which items are out of stock? The agent only mentions items present in the synchronized menu snapshot. If PosHUB marks an item unavailable, it leaves the snapshot on the next refresh — the agent will not offer it.
Can I have multiple PosHUB locations on a single agent? No, one project serves one PosHUB location. To switch the location an agent serves, change the PosHUB Location setting in Newo Builder and click Publish All. The integration will re-pull the menu for the new location.
Why does the PosHUB Location dropdown show both a name and an id?
That is expected. The visible dropdown is formatted as Location Name (location_id) so operators can tell similar locations apart. The integration stores the raw UUID separately in a hidden setting and uses that hidden value at runtime.
Why does the agent sometimes repeat weird menu names verbatim?
Because PosHUB is the source of truth for order payloads. If the synchronized menu says Vanilla Milkshake Milkshakes, the order flow intentionally keeps that exact item name so the submitted payload matches the PosHUB menu exactly instead of risking a wrong item match.
Why are two URL fields read-only? The PosHUB Menu Publications URL and PosHUB Update Stores Status URL are generated by Newo and only PosHUB needs the value. Editing them in Newo would have no effect — paste them into your PosHUB application settings instead.
The customer wants to use the SMS ordering link instead of placing the order in the conversation. Should the agent allow that? The shipped scenario tells the agent to keep the order inside the conversation and not to redirect customers to a website or SMS link. If you want the agent to offer the SMS ordering link as a fallback, add that branch in Newo Builder before the trigger-phrase step.
Common errors and recovery
Publish All fails with an authentication error
Likely cause. One of the four credential fields (PosHUB Client ID, PosHUB Client Secret, PosHUB Admin Username, PosHUB Admin Password) is wrong, or PosHUB has not yet enabled the password grant for your application.
How to recover.
- In Newo Builder, double-check the four credential fields and confirm they match the values from the PosHUB Developer Portal exactly (no leading or trailing spaces).
- If the credentials look correct, ask the PosHUB team in
#poshub_newo_partnerto confirm the password grant is enabled for your Client ID. - Click Publish All again.
How to verify. The PosHUB Location dropdown becomes populated within a minute of the next Publish All, and the hidden setup error settings clear out.
The PosHUB Location dropdown stays empty after Publish All
Likely cause. The reseller credentials are valid but the reseller account has no locations associated with it, or PosHUB Reseller ID points at a different reseller than the one that owns your locations.
How to recover.
- Confirm with the PosHUB team that your reseller account has at least one provisioned location.
- Verify PosHUB Reseller ID matches the reseller that owns those locations.
- Click Publish All again.
How to verify. The dropdown shows one or more options; pick the right one and Publish All again.
The agent ignores ordering language
Likely cause. The Food Order via Agent intent or the Create PosHUB Order via Agent scenario was edited and the trigger phrase no longer matches verbatim.
How to recover.
- Open the scenario in Newo Builder and locate the submission step.
- Make sure the agent says exactly: "I will place your order right now and come back with the confirmation." — no rewording, no translation, no extra punctuation.
- Click Publish All again. If you would rather start from the shipped defaults, delete the edited intent and scenario from your canvas and Publish All — the integration will re-publish the missing copies.
How to verify. A test chat that asks to place an order succeeds end-to-end.
The agent says the store is offline when PosHUB shows it online
Likely cause. The store-status webhook never reached Newo, so the cached store status is stale.
How to recover.
- Open your PosHUB application settings and confirm the Update Stores Status URL field contains the value from PosHUB Update Stores Status URL in Newo (not an older value, not blank).
- Trigger any store-status change in PosHUB (toggle online → offline → online); the webhook fires on each transition.
- Try the order again.
How to verify. The agent stops claiming the store is offline and proceeds with order placement.
Menu items the customer asks for are missing or stale
Likely cause. The menu webhook is not configured, so the menu snapshot only refreshes when the cache window expires (six hours by default).
How to recover.
- Confirm the PosHUB Menu Publications URL value from Newo is pasted into your PosHUB application's Menu Publications URL field.
- Republish the menu in PosHUB to fire a fresh webhook, or wait out the cache window.
How to verify. The customer's question about a recently added or updated item gets the right answer from the agent.
Limitations
- One location per project. To serve multiple PosHUB locations, run one Newo project per location.
- No live availability or appointments. PosHUB is an ordering platform; the agent does not check time-slot availability or schedule appointments.
- No payment in conversation. The agent does not collect or process payment — PosHUB handles payment on its side.
- No menu editing. The agent only reads the synchronized menu; edits happen in PosHUB.
- Required modifiers must be selectable on the agent's side. If a PosHUB menu item requires a modifier the agent cannot infer or ask about (e.g. modifier text in a language the agent does not speak well), the order will sit in clarification until the customer chooses one.
- Cancellation depends on PosHUB. Once PosHUB hands the order to the kitchen, cancellation may be rejected; the agent will surface that result rather than override it.
Support handoff notes
For the support engineer or partner who takes over the deployment:
- Auth method: OAuth 2.0 via the PosHUB reseller flow — client_credentials for runtime requests, password grant for setup discovery. Token refresh is automatic; the integration always stores the latest refresh token (PosHUB rotates on every refresh).
- External identifiers worth knowing: the value of PosHUB Client ID, PosHUB Reseller ID, and the chosen PosHUB Location id — all visible in the All settings reference table below.
- Feature toggles: Setup Canvas Scenarios is the only operator-facing toggle and it controls whether Publish All publishes the PosHUB intents and scenarios into the canvas library.
- Auto-setup did run if: the PosHUB Location dropdown is populated, both webhook URL fields contain
https://...URLs, and the canvas library has the three PosHUB intents. - Two most common fixes: (1) re-paste the latest PosHUB Admin Password when authentication starts failing; (2) confirm the two webhook URLs are pasted into the PosHUB application settings if the agent stops seeing menu updates or store-status changes.
All settings reference
The Name column lists the technical identifier — useful when correlating with API logs or Newo admin views. Operators normally interact with these settings by their bold label, not the identifier.
| Name | Description | Required | Default | Hidden | Edit |
|---|---|---|---|---|---|
poshub_base_url | PosHUB Base URL — PosHUB API base URL. Use the staging URL while you are being certified, and the production URL after PosHUB approves your application. | yes | https://api.tryposhub.com | no | ✅ |
poshub_client_id | PosHUB Client ID — application client ID from the PosHUB Developer Portal. | yes | — | no | ✅ |
poshub_client_secret | PosHUB Client Secret — application client secret from the PosHUB Developer Portal. | yes | — | no | ✅ |
poshub_reseller_id | PosHUB Reseller ID — reseller identifier used for the official onboarding flow. | yes | — | no | ✅ |
poshub_admin_username | PosHUB Admin Username — reseller / admin username used to request the setup-time reseller token. | yes | — | no | ✅ |
poshub_admin_password | PosHUB Admin Password — reseller / admin password used to request the setup-time reseller token. | yes | — | no | ✅ |
poshub_location_id | PosHUB Location — the visible location dropdown for this project. Auto-populated after the first Publish All; pick a value and republish. The visible value is formatted as Location Name (location_id). | yes (after first publish) | — | no | ✅ |
poshub_setup_scenarios | Setup Canvas Scenarios — when on, default PosHUB order intents and scenarios are added to the canvas during Publish All. | no | True | no | ✅ |
poshub_menu_publication_url | PosHUB Menu Publications URL — generated Newo URL. Paste this into the PosHUB app setting named Menu Publications URL. | yes | — | no | 🔒 |
poshub_update_store_status_url | PosHUB Update Stores Status URL — generated Newo URL. Paste this into the PosHUB app setting named Update Stores Status URL. | yes | — | no | 🔒 |
poshub_default_prep_time_minutes | Default Prep Time Minutes — fallback average prep time used for ASAP pickup/delivery estimates when the selected PosHUB location does not provide defaultPrepTimeMinutes. | no | 5 | no | ⚠️ |
poshub_account_id | PosHUB Account ID — merchant account identifier resolved automatically during onboarding. | no | — | yes | 🔒 |
poshub_selected_location_id | Selected Location ID — hidden raw UUID for the currently selected PosHUB location. Runtime API and webhook skills use this value, not the visible dropdown label. | no | — | yes | 🔒 |
poshub_location_options_cache | Location Options Cache — hidden mapping between the visible location dropdown labels and raw PosHUB location UUIDs. | no | — | yes | 🔒 |
poshub_application_id | PosHUB Application ID — application identifier resolved automatically during setup. | no | — | yes | 🔒 |
poshub_menu_id | PosHUB Menu ID — primary menu identifier discovered automatically for the selected location. | no | — | yes | 🔒 |
poshub_onboarding_url | PosHUB Onboarding URL — latest onboarding URL returned by the reseller applications endpoint. | no | — | yes | 🔒 |
poshub_default_timezone | Default Timezone — fallback IANA timezone sent in create-order requests when one cannot be inferred from the location. | no | UTC | yes | ⚠️ |
poshub_scopes | OAuth2 Scopes — default scope string used for both setup and runtime tokens. | no | (preset list) | yes | ⚠️ |
poshub_order_source_name | Order Source Name — source name sent in PosHUB order creation payloads. | no | Newo | yes | ⚠️ |
poshub_access_token | Access Token — cached runtime PosHUB bearer token. | no | — | yes | 🔒 |
poshub_access_token_expires_at | Access Token Expiration — Unix timestamp when the cached runtime bearer token expires. | no | 0 | yes | 🔒 |
poshub_refresh_token | Refresh Token — cached runtime PosHUB refresh token. | no | — | yes | 🔒 |
poshub_admin_access_token | Setup Admin Access Token — cached reseller / admin token used only during setup discovery. | no | — | yes | 🔒 |
poshub_admin_access_token_expires_at | Setup Admin Access Token Expiration — Unix timestamp when the cached setup token expires. | no | 0 | yes | 🔒 |
poshub_prepared_location_id | Prepared Location ID — location for which PosHUB metadata was last prepared, used to detect a location change and re-discover. | no | — | yes | 🔒 |
poshub_menu_export_cache | Menu Export Cache — cached menu export used to map conversation items to PosHUB identifiers. | no | {} | yes | 🔒 |
poshub_menu_prompt_context | Menu Prompt Context — prompt-ready summary of the synchronized PosHUB menu used internally by order payload extraction. | no | {} | yes | 🔒 |
poshub_menu_cache_updated_at | Menu Cache Updated At — Unix timestamp for the latest successful menu refresh. | no | 0 | yes | 🔒 |
poshub_menu_cache_range_seconds | Menu Cache Range Seconds — freshness window in seconds for the shared PosHUB menu cache. | no | 21600 (6h) | yes | ⚠️ |
poshub_store_status | Store Status — latest store status received from PosHUB (ONLINE, OFFLINE, CLOSED). | no | ONLINE | yes | 🔒 |
poshub_last_setup_error | Last Setup Error — last setup error payload returned by PosHUB, useful when debugging a failed Publish All. | no | — | yes | 🔒 |
poshub_last_menu_sync_error | Last Menu Sync Error — last menu synchronization error payload, useful when debugging stale menus. | no | — | yes | 🔒 |
setup_persona_id | Setup Persona ID — hidden internal persona used for setup-time discovery, menu refresh, and webhook-driven maintenance tasks. | no | — | yes | 🔒 |
Edit legend. ✅ safe to change at any time · ⚠️ advanced — change only when you know what it controls · 🔒 auto-managed by the integration — do not edit manually.
Changelog
v1.0.7 — Webhook-triggered refreshes without stored connection IDs
- Store-status webhooks now trigger a fresh PosHUB connections lookup and select the relevant connection from the response instead of relying on webhook payload data.
- Removed the hidden PosHUB connection ID setting; the integration derives the needed connection from the current account, location, and application during refresh.
- Store status now updates only from PosHUB
storeStatus, avoiding confusion with connection lifecycle states likePENDING. - Menu publication webhooks continue to trigger the existing menu sync path, keeping webhook payloads as triggers only.
v1.0.6 — Menu-context narrowing, exact-name safety, and cleaner setup metadata
- Added a local AKB-backed menu-selection path: the integration now narrows the synchronized menu to the most relevant categories for the current conversation and injects that subset as
PosHUBMenuInfo role="context". - Order extraction now preserves exact PosHUB menu item names even when the menu wording looks awkward or repetitive, reducing mis-matched create-order payloads.
- The visible location dropdown now shows
Location Name (location_id)while runtime code uses a hidden raw UUID, making setup clearer without breaking API requests. project_publish_finishcan rebuild the menu knowledge path from cached menu data without waiting for a fresh external menu export.
v1.0.0 — Initial PosHUB integration
- Place orders, check order status, and cancel orders through the agent.
- Synchronized PosHUB menu — webhook-driven refresh on PosHUB menu publish, plus a six-hour cache fallback.
- Webhook-driven store-online / offline / closed awareness.
- Reseller-flow onboarding (one Publish All to discover the location, a second to load the menu).
- Three canvas intents and three scenarios published automatically when Setup Canvas Scenarios is on.