Zoho Analytics Integration
What the AI can do
Summary
Zoho Analytics Integration connects Zoho Analytics (business intelligence and reporting platform) with Newo Platform.
It enables a single, fast workflow:
- Look up everything about a shipment / cargo / load by the cargo number (the Memo field on the bill) — due date, paid status, amount due, rate, payee — in one step that combines Bills and Vendors data on the fly.
- Optionally verify the caller's spoken company name against the vendor on the bill, using a configurable name-match check.
This integration is designed for logistics companies running QuickBooks Desktop who need an AI phone agent to answer vendor (carrier / transporter) inquiries about invoices, rates, and payment status using data exported from QuickBooks into Zoho Analytics tables.
Common use cases
- "What's the status of my invoice?" — Agent collects the cargo / load number and reads back due date, paid status, amount due, payee in one short reply.
- "What's the rate for this load?" — Same tool, same data. Whichever field the caller asks about, the agent answers from a single live lookup.
- "When will I be paid?", "Who's the payee?", "Is this load already paid?" — All answered from the same Bills record in one lookup.
- Optional caller scope-match — When Company Verification is enabled, the agent asks the caller for their company name, runs the lookup, and confirms the spoken name matches the vendor on the bill. A mismatch politely blocks the answer and asks the caller to clarify.
Features at a glance
| Feature | Supported | Notes |
|---|---|---|
| Unified Shipment Lookup | ✅ | One step covers invoice status, rate, payee, due date, paid status |
| Company Verification | ✅ | Optional. Compares the caller's spoken company name against the bill's vendor |
| Tunable Verification Strictness | ✅ | Edit the verification prompt to tighten or loosen the match threshold |
| Multi-Region Support | ✅ | US, EU, IN, AU, JP, SA, CA data centers |
| OAuth2 Authentication | ✅ | Standard redirect flow with token auto-refresh |
| Custom Canvas Scenarios | ✅ | Logistics-specific Introduction + Shipment Lookup scenarios |
| Booking / Scheduling | ❌ | Not applicable — this is a data query integration |
| Write Operations | ❌ | Read-only — agent never modifies Zoho Analytics data |
1.4 A note on caller "verification"
The optional verification step is a scope filter, not authentication:
- The agent compares the caller's spoken company name against the Vendor Name on the bill that matches the cargo number they gave.
- This is enough to scope a query ("read out this vendor's bill") without claiming to authenticate the caller.
- Phone is intentionally NOT used. Caller ID can be spoofed, and the phone number stored against the vendor in QuickBooks is typically the office contact — not the driver or dispatcher actually calling.
If you need stronger identity proof, prefer a knowledge-factor challenge (e.g. "name a recent load number from your account") over phone matching. Turn Company Verification Feature off if your operational risk model does not require this step at all — the lookup then runs immediately on the cargo number alone.
Before You Start
Before installation:
- Active Zoho Analytics account with API access (free tier works).
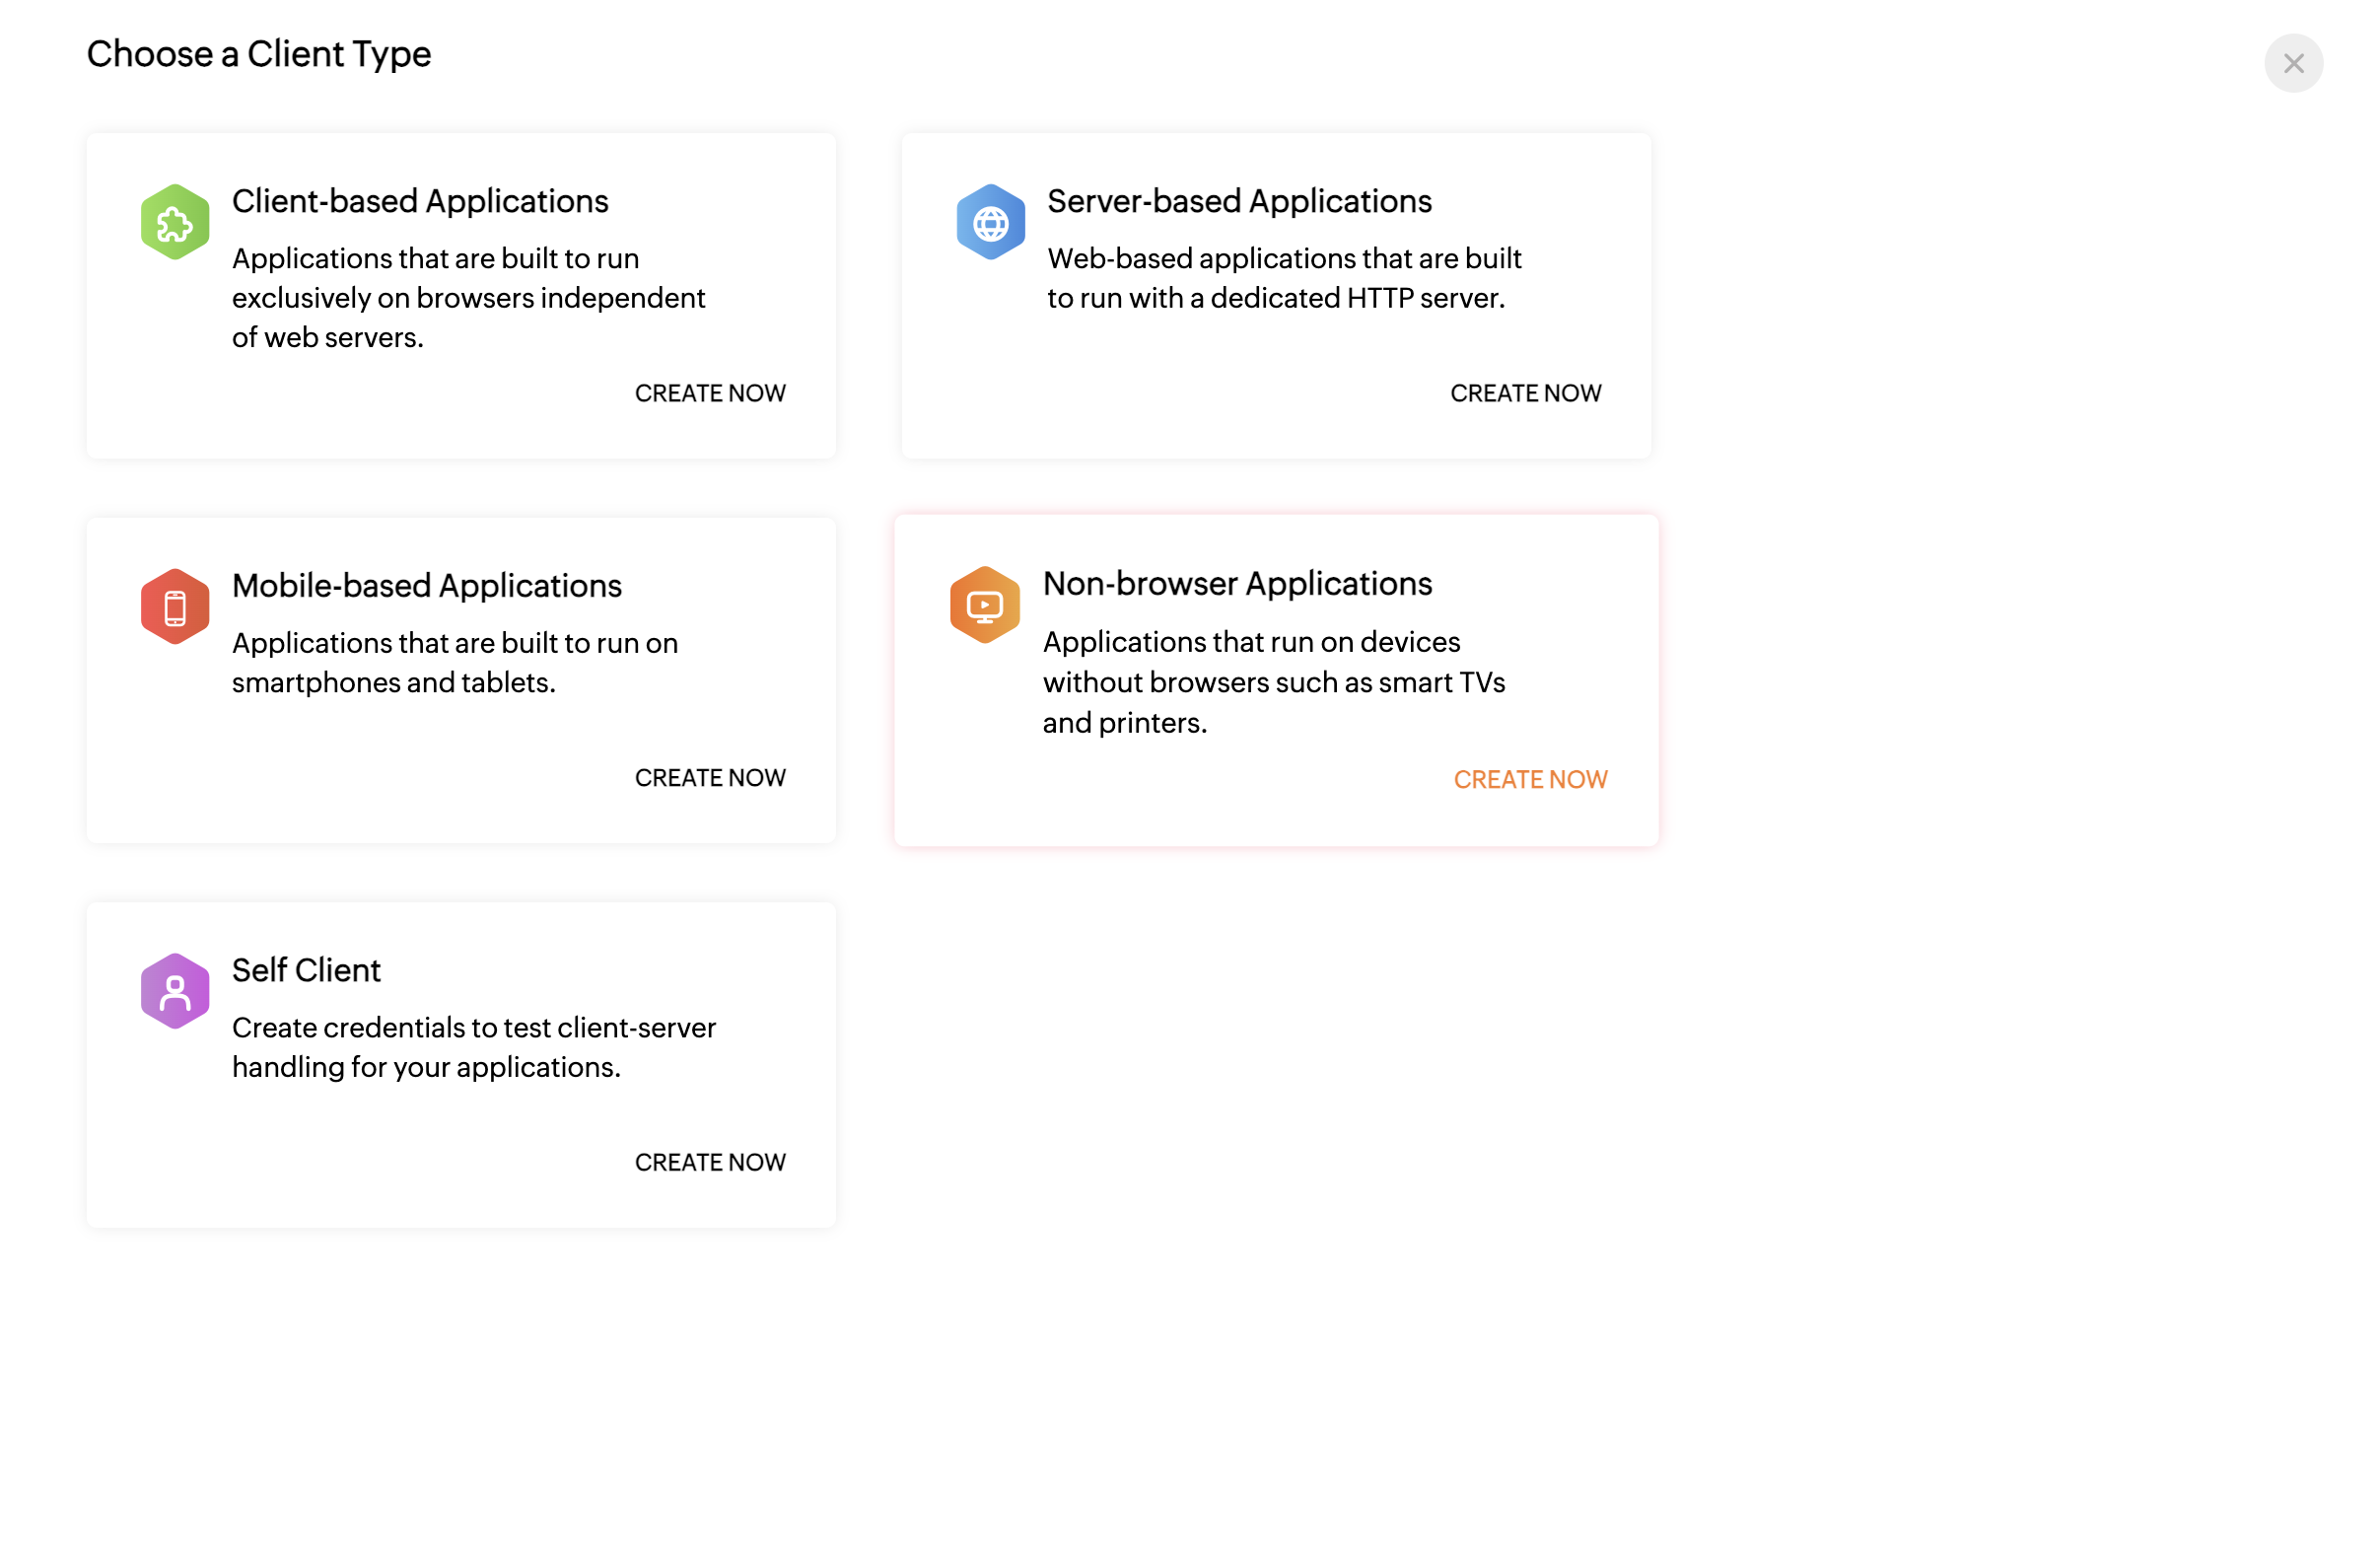
- Server-based Applications client registered in Zoho API Console.
- A Zoho Analytics workspace with two tables (typical QuickBooks Desktop export): Bills and Vendors.
- Cargo / load numbers must be stored in
Bills.Memo(this is how QuickBooks Desktop typically captures them).
Setup
Create the Newo project
If this project already exists in Newo Builder, skip this subsection and continue with the integration-specific settings below.
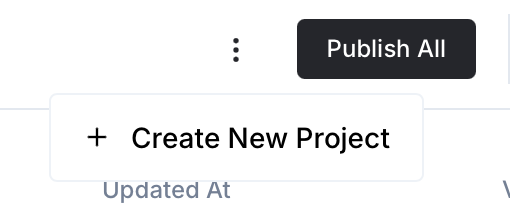
- In Newo Builder, open the projects list and click Create Project (or Create New Project from the top-right menu).
- Fill IDN and Title. The exact names do not matter; use any clear names your team will recognize.
- In Registry, choose the release channel:
- staging — the newest module fixes appear here first. Use it when you need the latest fix, but expect possible unfinished changes.
- production — the final stable version for live projects.
- In Module, select the module for this integration.
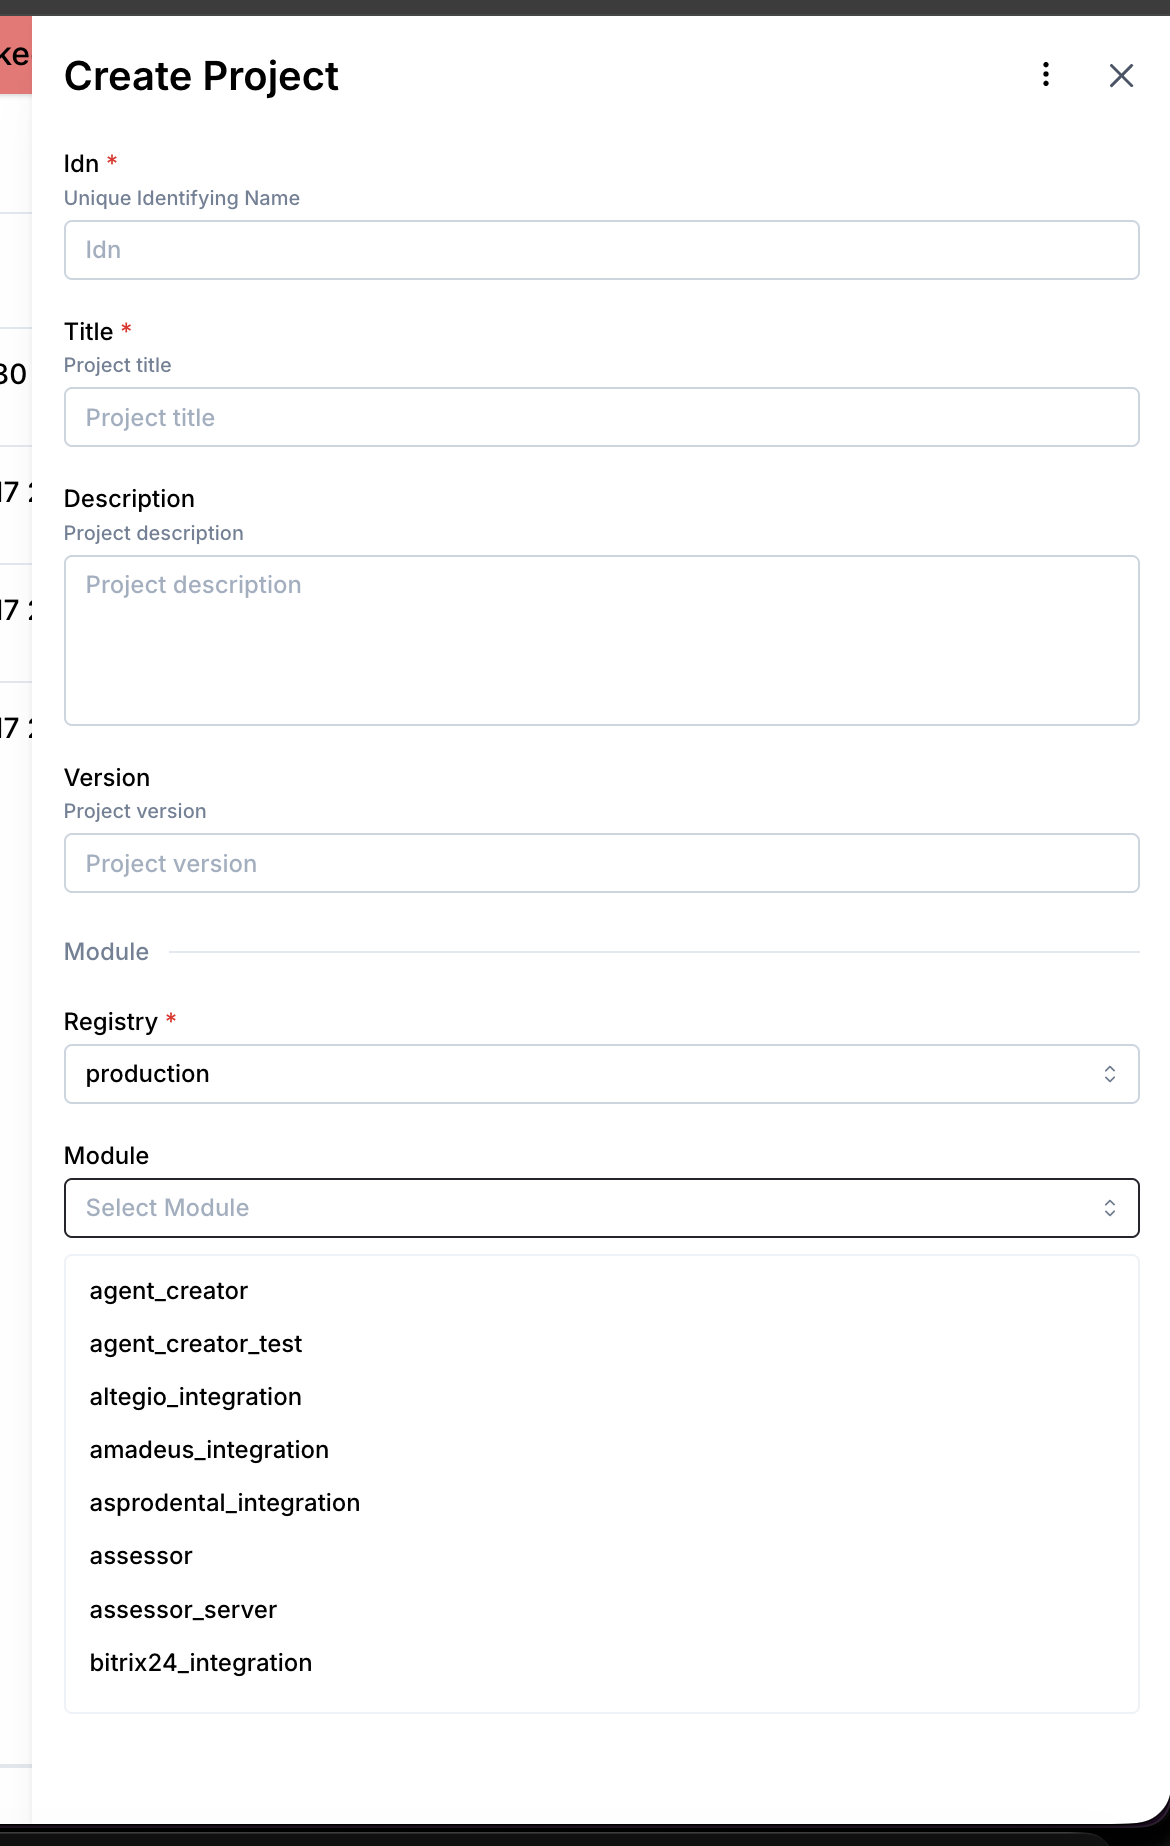 5. Leave Module version on Latest version unless support tells you to pin a specific version, then click Create.
3.1 Step 1 — Register OAuth Client in Zoho
- Go to Zoho API Console.
- Click Add Client → select Server-based Applications.
- Fill in:
- Client Name: any name you like — do not use "Zoho Analytics" (Zoho rejects client names that contain its own product names)
- Homepage URL:
https://newo.ai - Authorized Redirect URIs:
https://static.newo.ai/oauth/index.html
- Copy Client ID and Client Secret.
3.2 Step 2 — Prepare Tables in Zoho Analytics
The integration reads from two tables. Column names must match exactly (case-sensitive, with spaces).
Bills — vendor invoices (Accounts Payable). Cargo / load number lives in Memo.
| Column Name | Data Type | Used by integration |
|---|---|---|
| Bill ID | Plain Text | readback |
| Vendor ID | Plain Text | join key to Vendors |
| Bill Date | Date | readback |
| Due Date | Date | readback |
| Amount Due | Number | rate / amount due |
| Is Paid | Plain Text | readback |
| Paid Status | Plain Text | readback |
| Memo | Plain Text | cargo / load number (LIKE) |
Vendors — vendor (carrier / transporter) directory. Only Vendor ID, Vendor Name, and Company Name (fallback) are read by the integration.
| Column Name | Data Type | Used by integration |
|---|---|---|
| Vendor ID | Plain Text | join key from Bills |
| Vendor Name | Plain Text | canonical payee name; compared against caller's spoken company |
| Company Name | Plain Text | fallback when Vendor Name is empty |
| Phone | Plain Text | not used (see §1.4) |
| Plain Text | not used | |
| Contact | Plain Text | not used |
| Is Active | Plain Text | not used |
Important: Column names must match exactly (case-sensitive, with spaces). The integration queries by these exact column names.
3.3 Step 3 — Connect in Newo Platform
3.3.1 Install the Zoho Analytics module
- Open builder.newo.ai.
- Click the three vertical dots next to the Publish ALL button.
- Click + Create New Project.
- Fill in:
- Idn:
ZohoanalyticsIntegration - Title:
Zoho Analytics Integration - Registry:
production - Module:
zohoanalytics_integration - Module version:
Latest version - Auto update: enabled
- Idn:
- Confirm to create the project.
- In the row with ZohoanalyticsIntegration, click the three vertical dots next to the Manage button and select Force Update Project. After the page refreshes, a version number should appear in the Version column.
3.3.2 Configure attributes
- Open Project → Attributes.
- Set the following attributes (visible to operator):
| Attribute | Required | Description |
|---|---|---|
01. OAuth Code | ✅ | Paste the code from the Zoho redirect (one-time) |
02. Client ID | ✅ | OAuth2 Client ID from Zoho API Console |
03. Client Secret | ✅ | OAuth2 Client Secret from Zoho API Console |
04. Zoho Region | ✅ | Data center: US, EU, IN, AU, JP, SA, or CA |
05. Organization | ✅ | Pick the org from the auto-populated dropdown |
06. Workspace | ✅ | Pick the workspace from the auto-populated dropdown |
07. Bills View | ✅ | Pick the Bills table from the auto-populated dropdown |
08. Vendors View | ✅ | Pick the Vendors table from the auto-populated dropdown |
Shipment Lookup Feature | ❌ | Master switch for the shipment lookup feature (default: True) |
Company Verification Feature | ❌ | Toggle for the company-name match step (default: True) |
Automatically Add Default Scenarios to Canvas | ❌ | Auto-publish canvas scenarios (default: True) |
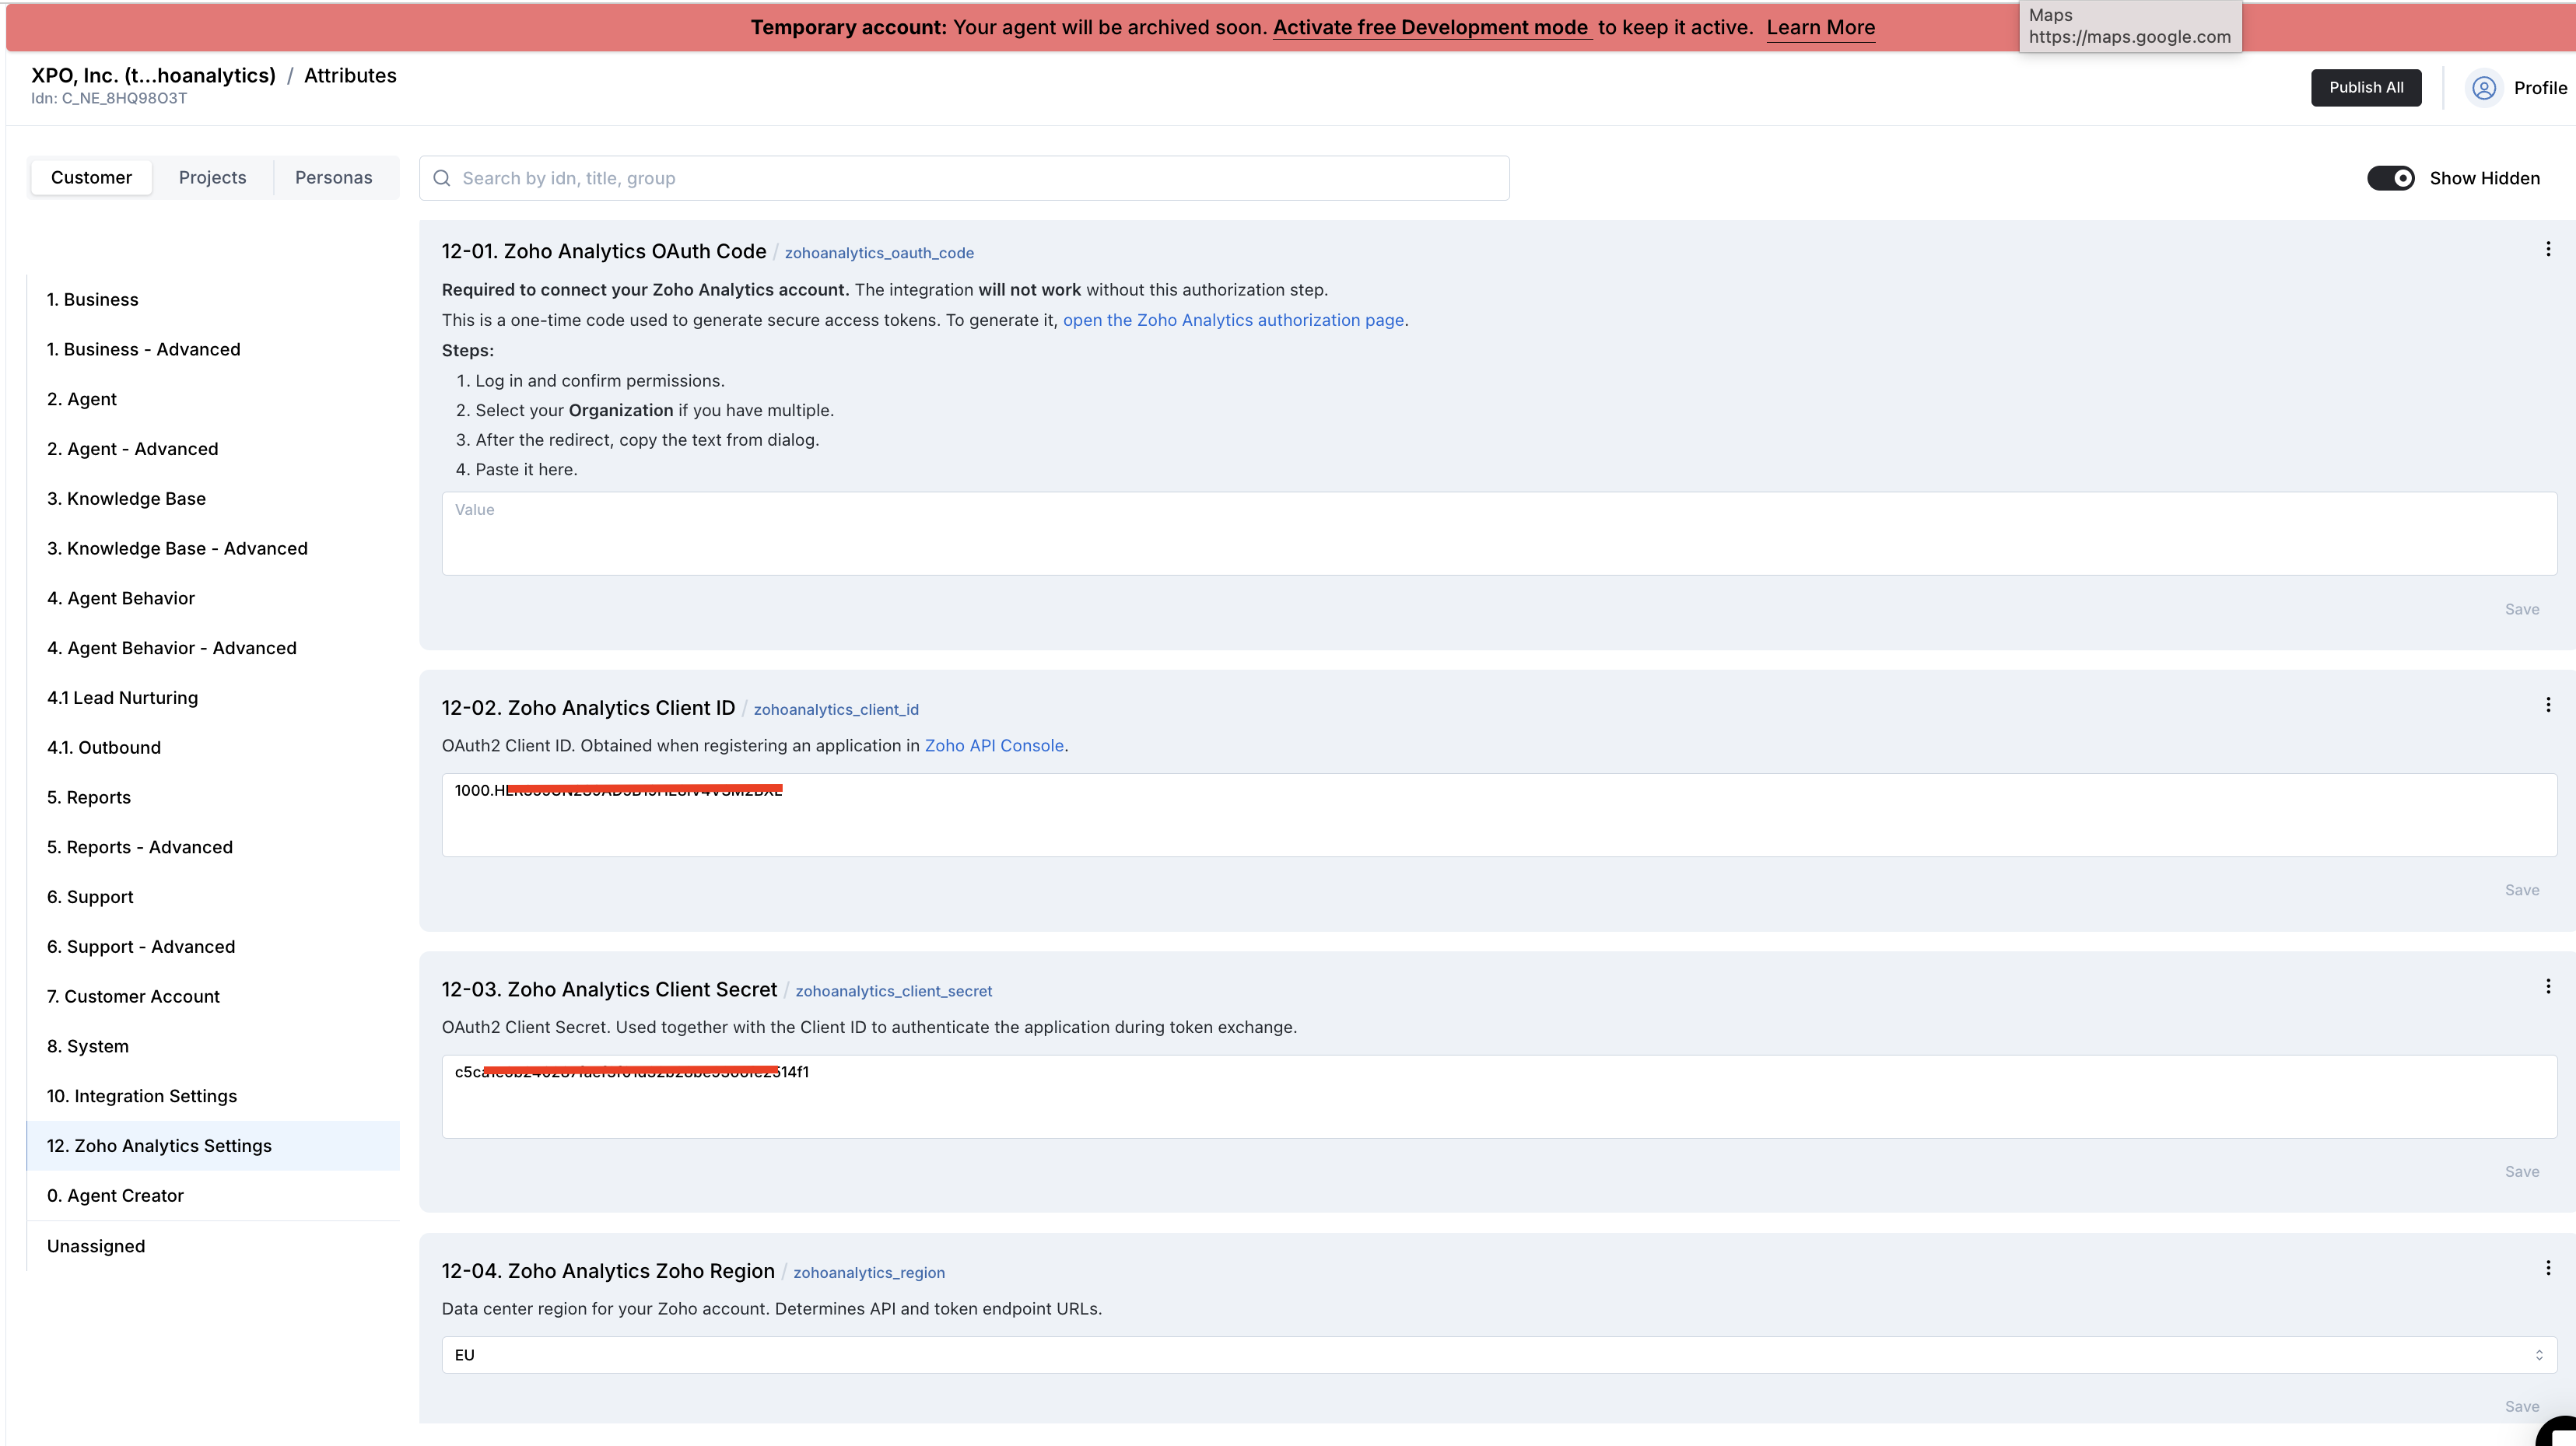
Important — apply this after every phase below: After you change any attribute value you must Save the attribute, then Publish the project, then refresh the page. After the refresh, click the Show hidden toggle twice (off → on) so the freshly populated hidden attributes (dropdowns / OAuth link) become visible.
Setup is 6-phase the first time
Phase 1 — Credentials and Region
- Fill in
02. Client ID,03. Client Secret,04. Zoho Region. - Save → Publish → refresh page (toggle Show hidden twice).
Phase 2 — OAuth Code
- Open the authorization link that appeared in
01. OAuth Code(or the helper attribute), authorize in Zoho, copy the returnedcodevalue. - Paste it into
01. OAuth Code. - Save → Publish → refresh page (toggle Show hidden twice).
Phase 3 — Organization
- Pick the value in
05. Organizationfrom the dropdown that just appeared. - Save → Publish → refresh page (toggle Show hidden twice).
Phase 4 — Workspace
- Pick the value in
06. Workspacefrom the dropdown. - Save → Publish → refresh page (toggle Show hidden twice).
Phase 5 — Bills View
- Pick the value in
07. Bills Viewfrom the dropdown. - Save → Publish → refresh page (toggle Show hidden twice).
Phase 6 — Vendors View
- Pick the value in
08. Vendors Viewfrom the dropdown. - Save → Publish → refresh page (toggle Show hidden twice).
After the final publish the integration is fully connected: the agent can answer shipment questions, and the default scenarios (Introduction + Shipment Lookup) are added to the Workflow Builder Canvas.
How to use the integration
4.1 How the Integration Works
When a vendor calls about a shipment, the agent:
- Catches the cargo / load number from the conversation (and, if Verification is on, the caller's company name).
- Looks up the matching bill in Zoho Analytics, joins it with the vendor record, and gets due date, paid status, amount due, and payee.
- Optionally checks that the caller's company name matches the vendor on the bill.
- Answers the question — only the specific field the caller asked about, or the whole picture if the caller asked an open question.
If something is missing — cargo number is unclear, the caller hasn't said their company, the bill is not found, or the company name doesn't match — the agent politely asks the caller to clarify and re-runs the lookup.
The agent never asks the same question twice in one call. Session data resets automatically when the call ends.
Where to test
Testing can be done through the Newo conversation interface (chat or voice channel) by interacting with the agent as a vendor calling about an invoice / rate.
Test checklist
To test the integration:
- Setup: Publish the project through all 3 phases and verify the dropdowns (Organization, Workspace, Bills View, Vendors View) populate and stay selected.
- OAuth: Click the authorization link in the OAuth Code attribute, authorize in Zoho, paste the code back into the attribute, and publish again. The integration stores the tokens automatically.
- Happy path (Verification ON):
- Say "Hi, I'm calling from [Vendor Name as it appears in your Vendors table] about load [cargo number from Bills.Memo]".
- Agent reads the cargo number back and confirms it is looking the shipment up.
- Agent returns due date, paid status, amount due, payee in one short reply.
- Field-specific question: Ask "When is load [cargo] due?" or "Is load [cargo] paid?" → agent answers ONLY that field, no extra noise.
- Verification failed: Say a vendor name that does not match the bill's payee → agent apologizes and asks the caller to repeat the exact company name from their paperwork, then re-runs the lookup.
- Not found: Ask about a cargo number that does not exist in the Bills table → agent says no shipment was found and offers to double-check or transfer to accounting.
- Verification OFF (set
Company Verification Feature=Falseand re-publish): repeat steps 3-4 — the agent will skip the company question and answer from the cargo number alone.
If no action occurs:
- Ensure Client ID and Client Secret are set before the first Publish.
- Verify Region matches your Zoho account data center (check URL:
.zoho.com= US,.zoho.eu= EU, etc.). - Confirm both view dropdowns (Bills, Vendors) are picked — leaving the placeholder selected silently disables the feature.
- Re-publish after any attribute changes.
- Check that table column names match exactly:
Bill ID,Vendor ID,Memo,Bill Date,Due Date,Amount Due,Is Paid,Paid Status,Vendor Name,Company Name. - Verify data exists in Zoho Analytics tables (empty tables return "not found").
- Make sure cargo numbers in
Bills.Memoare stored as bare identifiers (LD34436) — the lookup uses substring matching, so verbose memos like "LD34436 — partial pay" still match, but inconsistent prefixes can produce unexpected hits.
Note: This integration performs read-only queries against Zoho Analytics. No data is modified in Zoho Analytics through the agent.
FAQ
Q: Does the integration modify data in Zoho Analytics? A: No. The integration is read-only — it only looks up rows. No data is created, updated, or deleted.
Q: How does data get into Zoho Analytics tables? A: Data must be synced from QuickBooks Desktop (or another source) to Zoho Analytics separately. Zoho Analytics supports imports from databases, CSV, cloud storage, and 250+ integrations. Data freshness depends on your sync frequency.
Q: What if a vendor's invoice has the cargo / load number outside the Memo column?
A: The integration always reads from Bills.Memo. If your QuickBooks export stores the cargo number in a different field, copy or compute it into Memo during the sync to Zoho Analytics — that is the cheapest place to fix it.
Q: What happens if the caller does not give the company name and Verification is on? A: The agent asks them once, then re-runs the lookup with their answer. The caller is never asked the company name twice in the same call after a successful match.
Q: Can I make verification more or less strict? A: Yes. The verification check is driven by an editable prompt under the advanced settings. By default it is forgiving on typos, word order, and legal suffixes (LLC / Inc / Corp) and treats names as a match at around 60% similarity. Tighten or loosen the wording to suit how strict you want the check to be.
Q: I added new vendors or bills in Zoho Analytics — when will the agent see them? A: Immediately. Every lookup is a live query against Zoho Analytics, so changes you make there are picked up on the very next call.
Q: Can the agent handle multiple lookups in one call? A: Yes. After answering one shipment, the agent stays on the lookup scenario. The caller can ask about another cargo number and the next lookup runs independently. Per-call data is cleared automatically when the call ends.
Q: What if the Bills table has more than 1 million rows? A: The current setup is designed for tables up to 1 million rows. If you expect more, contact us — a different lookup approach will be needed.
Q: Which Zoho regions are supported? A: US, EU, India, Australia, Japan, Saudi Arabia, and Canada. Set the correct region in the Region attribute.
Q: Can I use the Zoho Analytics free tier? A: Yes. The free tier (2 users, 5 workspaces, 10,000 rows) is sufficient for testing and small deployments.