Workiz Integration
What the AI can do
Summary
Workiz Integration connects Workiz (field service management platform) with Newo Platform.
It enables:
- Creating service jobs in Workiz with full customer details, address, job type, and scheduling
- Automatic technician assignment to created jobs
- Cancelling existing jobs by setting status to "Canceled"
- Looking up existing jobs for returning customers by phone number
- Syncing dispatcher team members from Workiz for technician assignment
- DevMode for testing without real API credentials (LLM-emulated responses)
- Auto-configuring conversation canvas with booking and cancellation scenarios
This integration is designed for home services businesses (appliance repair, plumbing, electrical, HVAC, cleaning, etc.) who use Workiz to manage their field operations and need an AI receptionist to book and cancel jobs through voice or chat.
Common use cases
- When a caller requests a service → Agent collects details (name, phone, email, address, job type, date/time) and creates a job in Workiz
- When a caller wants to cancel an appointment → Agent finds the booking and cancels it in Workiz
- When a returning customer calls → Agent looks up their existing jobs by phone number
- When the project is published → Agent syncs the dispatcher team list from Workiz for technician assignment
Features at a glance
| Feature | Supported | Notes |
|---|---|---|
| Create Job | ✅ | Full customer details, address, job type, date/time |
| Cancel Job | ✅ | Sets job status to "Canceled" with optional notes |
| Technician Assignment | ✅ | Auto-assigns primary tech from dispatcher team |
| Existing Client Lookup | ✅ | Search jobs by phone number, filters future bookings |
| Team Sync | ✅ | Loads dispatcher-capable team members on publish |
| Canvas Auto-Setup | ✅ | Booking + cancellation scenarios and intents |
| DevMode (LLM Emulation) | ✅ | Test without real API — LLM generates realistic responses |
| Check Availability | ❌ | Workiz API does not support availability queries |
| Reschedule | ❌ | Cancel + rebook as workaround |
| Payment Processing | ❌ | Not implemented |
Before You Start
Before installation:
- Active Workiz account with API access
- API Key from Workiz Settings → Integrations → API
- API Secret from the same page
- At least one team member with a dispatcher-capable role (dispatch, manager, or admin)
Setup
Create the Newo project
If this project already exists in Newo Builder, skip this subsection and continue with the integration-specific settings below.
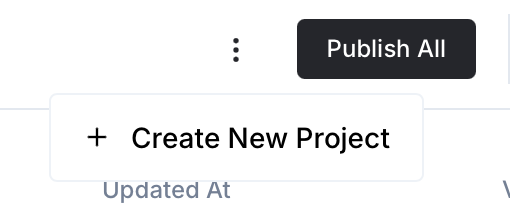
- In Newo Builder, open the projects list and click Create Project (or Create New Project from the top-right menu).
- Fill IDN and Title. The exact names do not matter; use any clear names your team will recognize.
- In Registry, choose the release channel:
- staging — the newest module fixes appear here first. Use it when you need the latest fix, but expect possible unfinished changes.
- production — the final stable version for live projects.
- In Module, select the module for this integration.
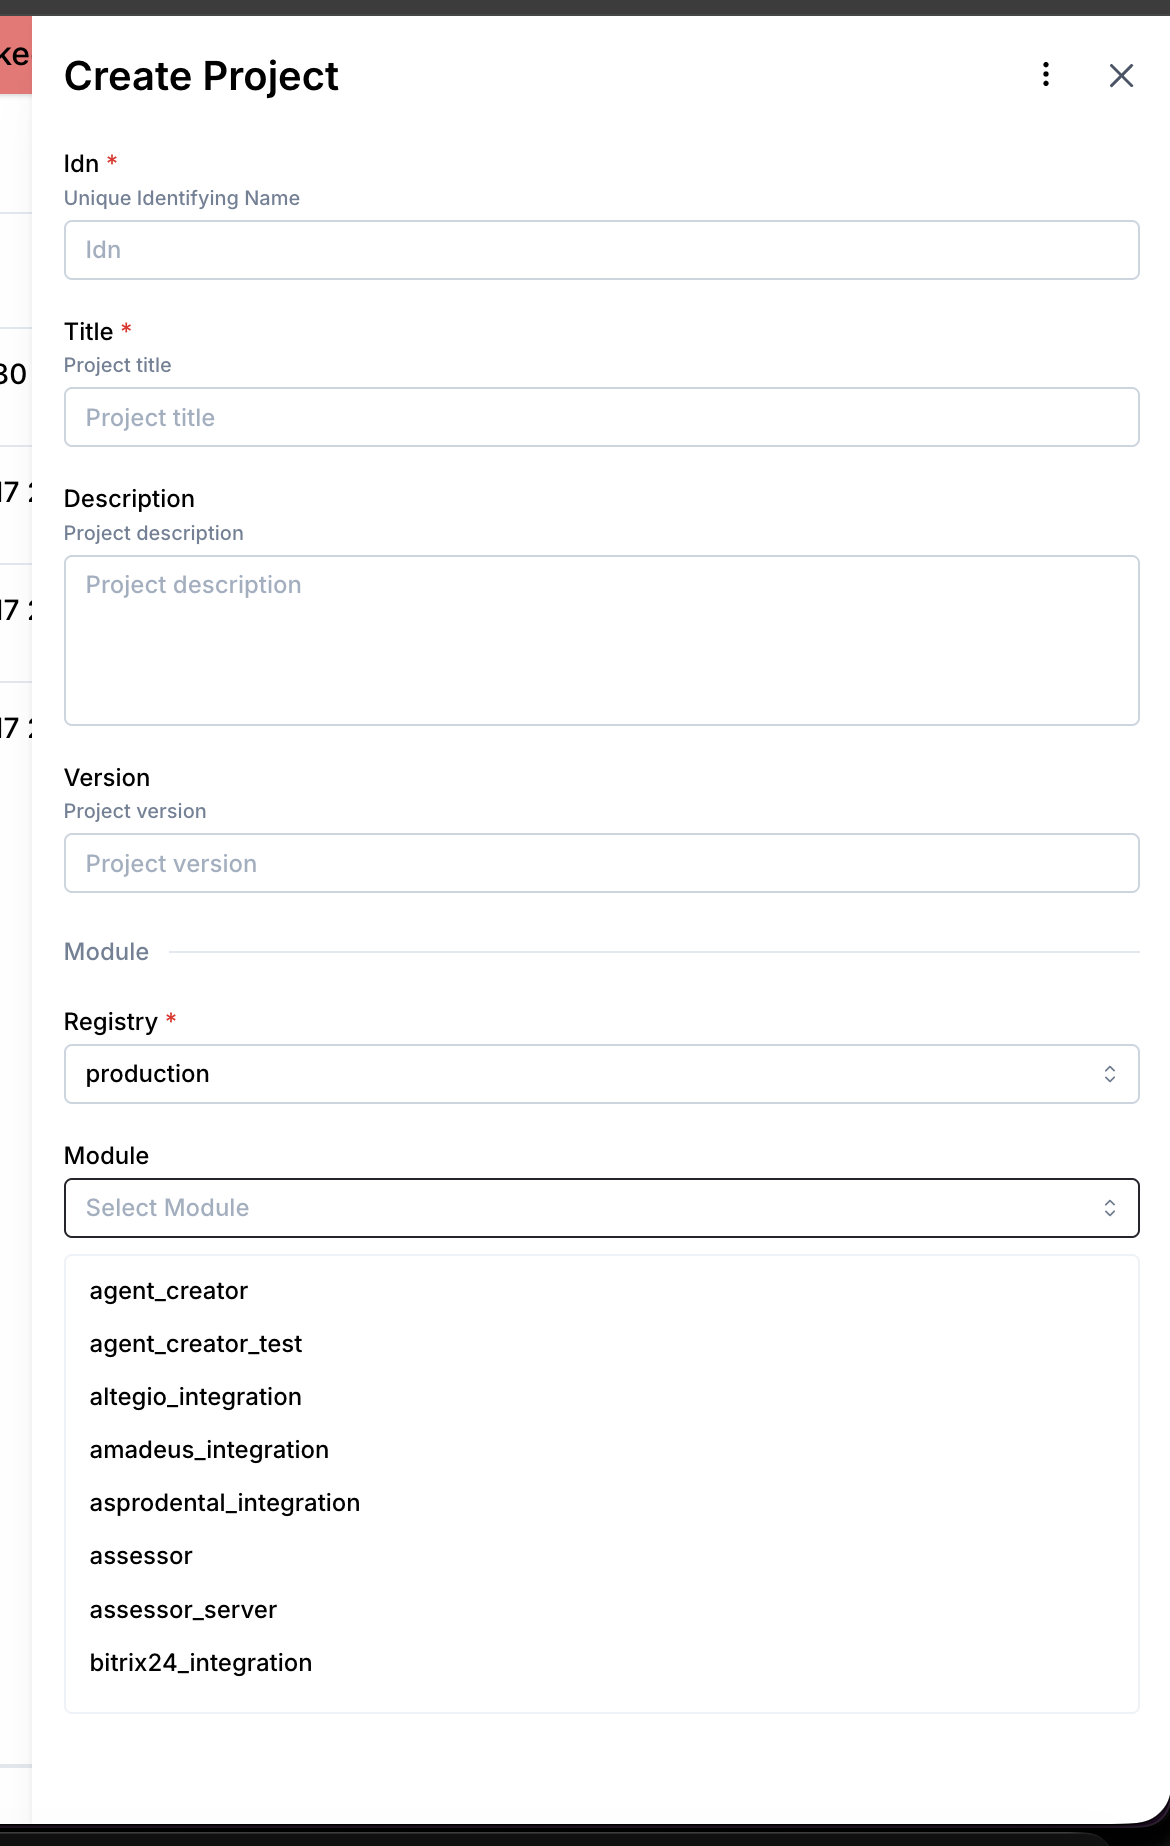 5. Leave Module version on Latest version unless support tells you to pin a specific version, then click Create.
3.1 Step 1 — Get API Credentials from Workiz
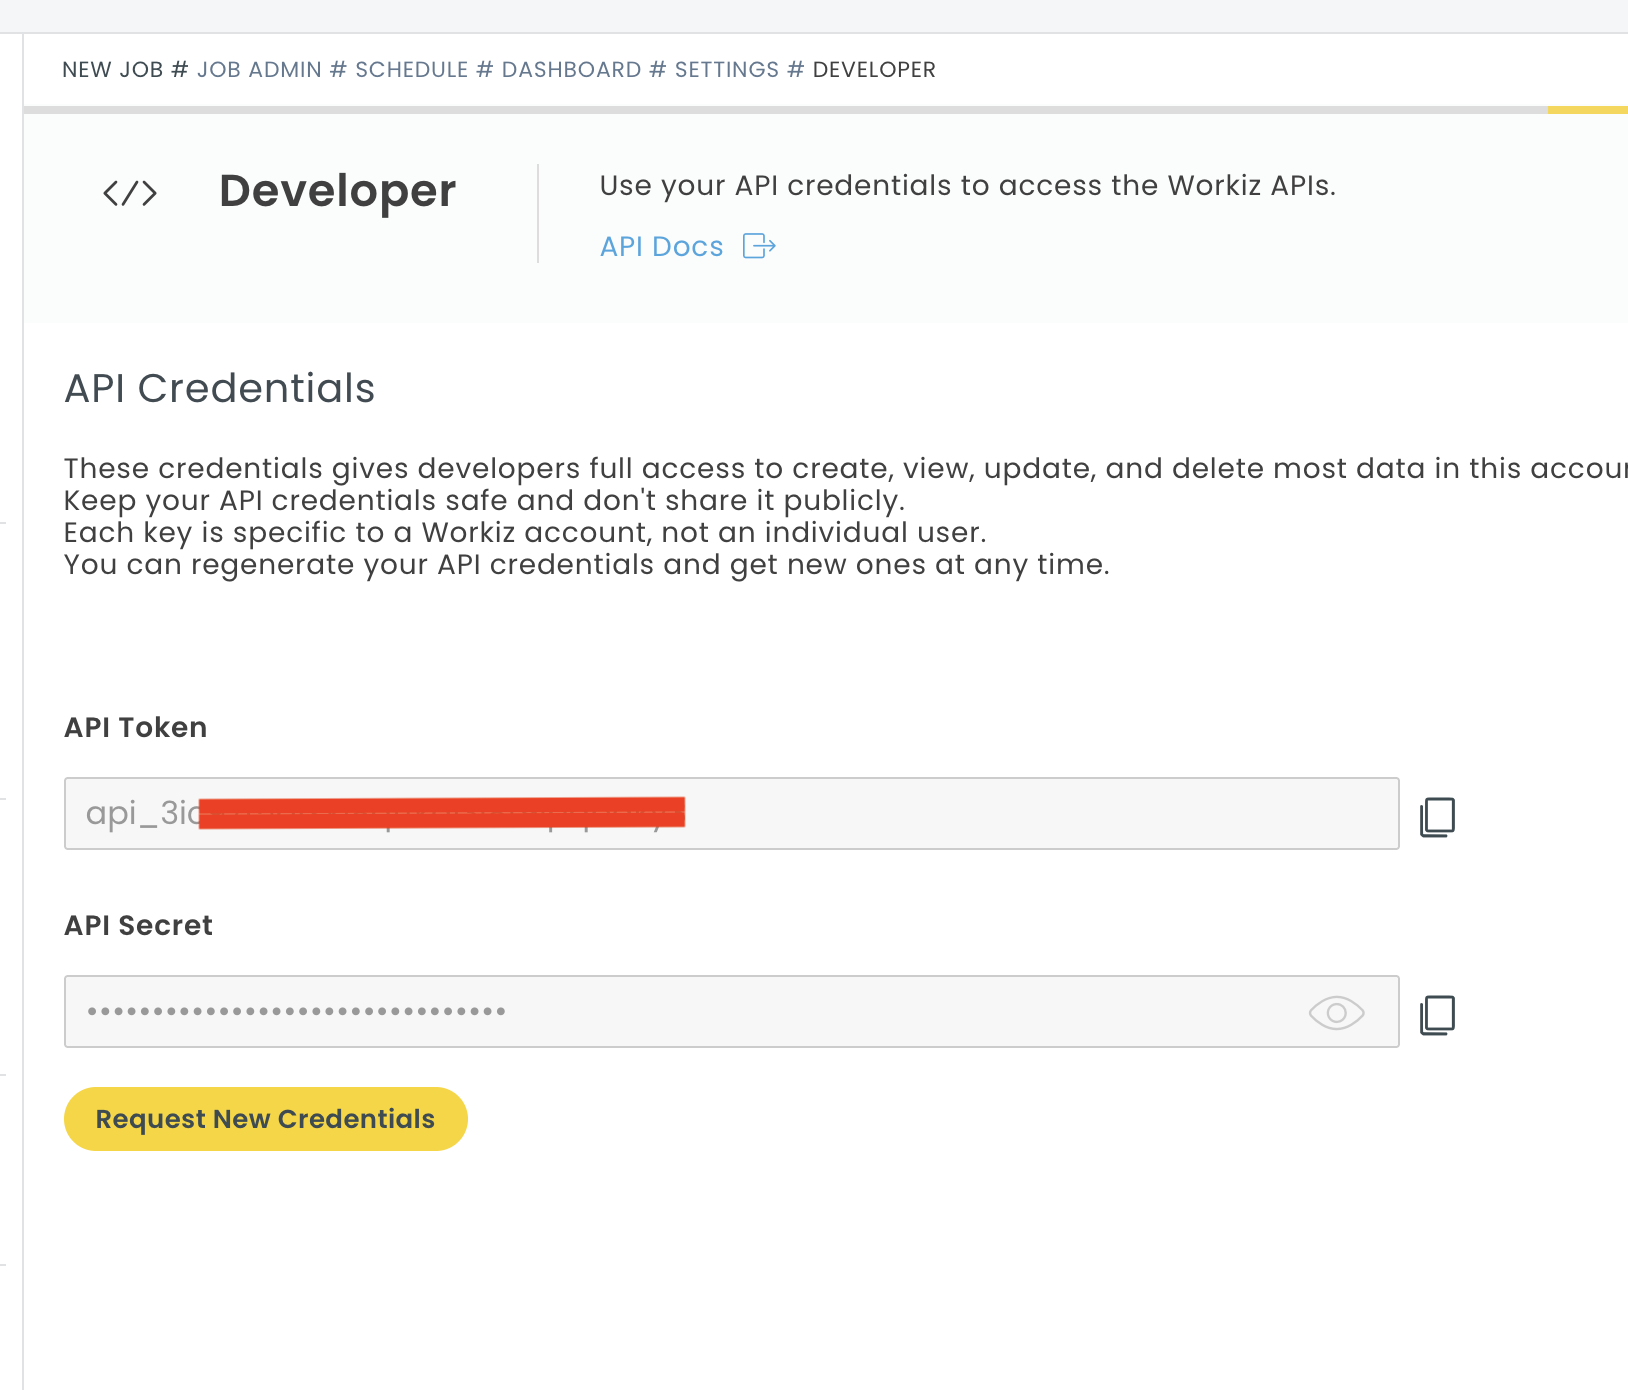
- Log in to your Workiz account at https://app.workiz.com
- Navigate to Settings → Integrations → API
- Copy the API Token (this is your API Key)
- Copy the API Secret
- Note your Job Types from Settings → Job Types (e.g., "Dishwasher", "Dryer", "Refrigerator")
📸 Screenshot: Workiz Settings → Integrations → API page showing API Token and Secret
3.2 Step 2 — Connect in Platform
- Open Newo → Projects
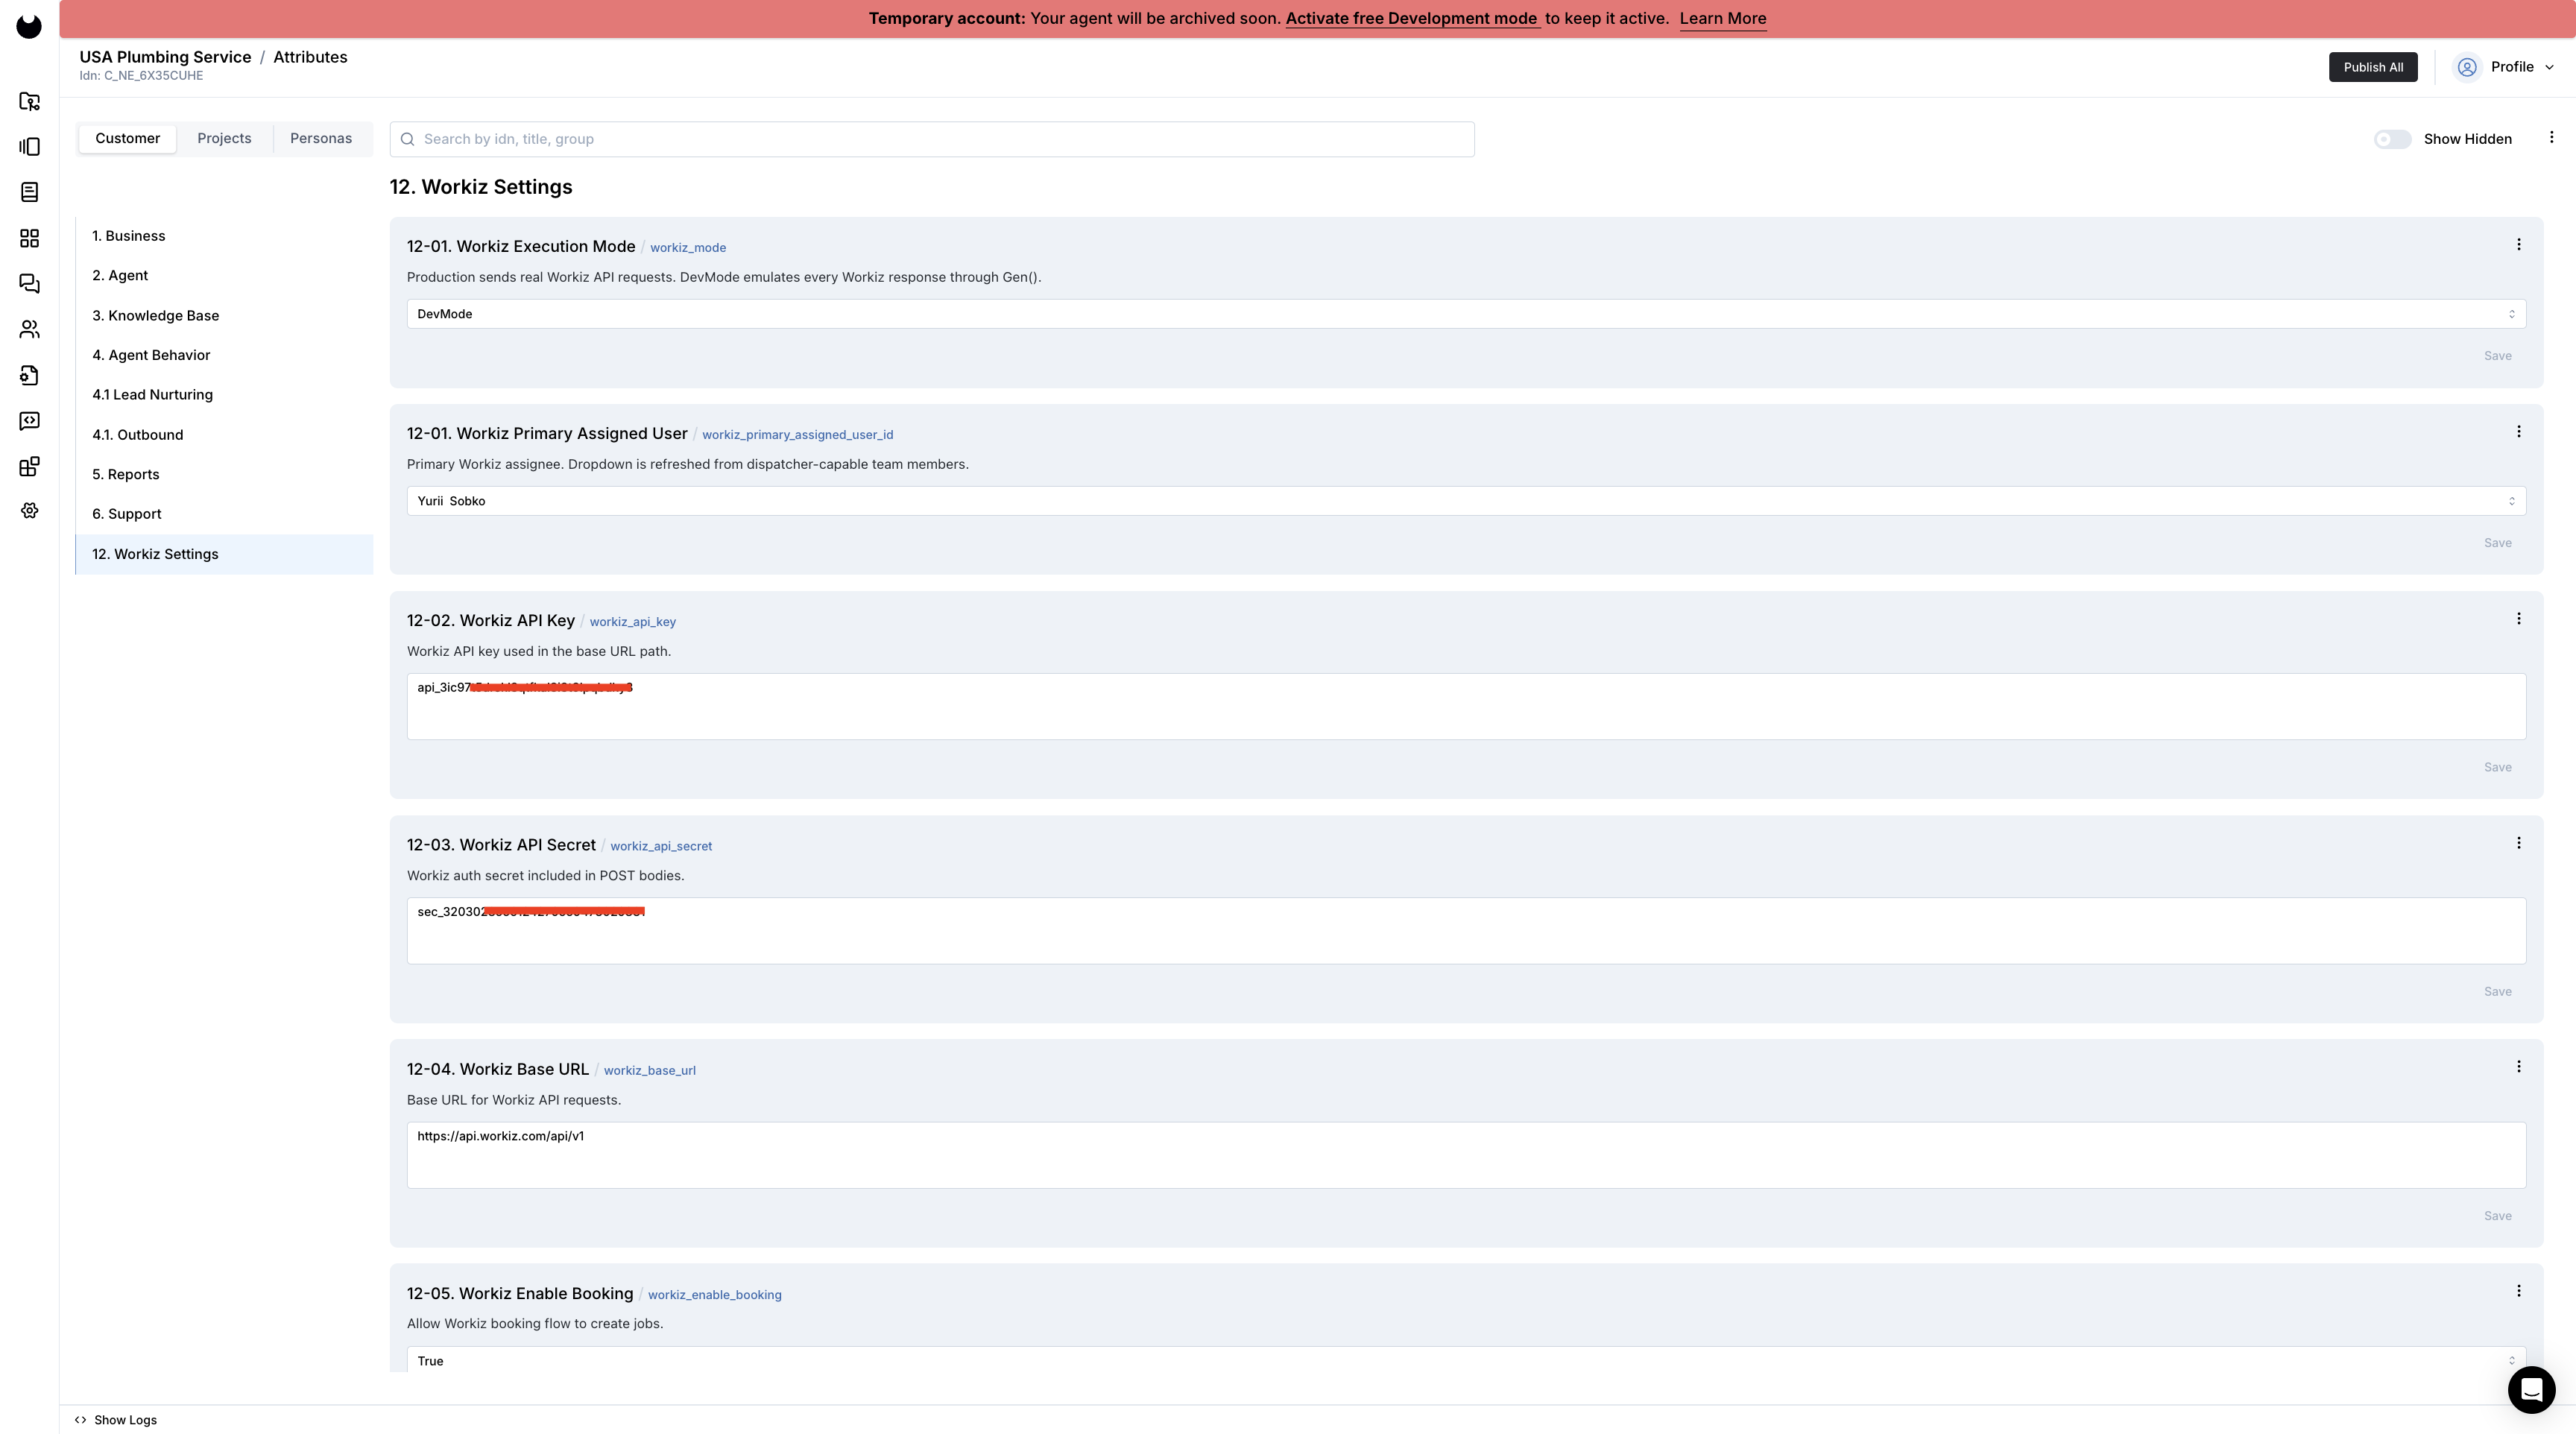
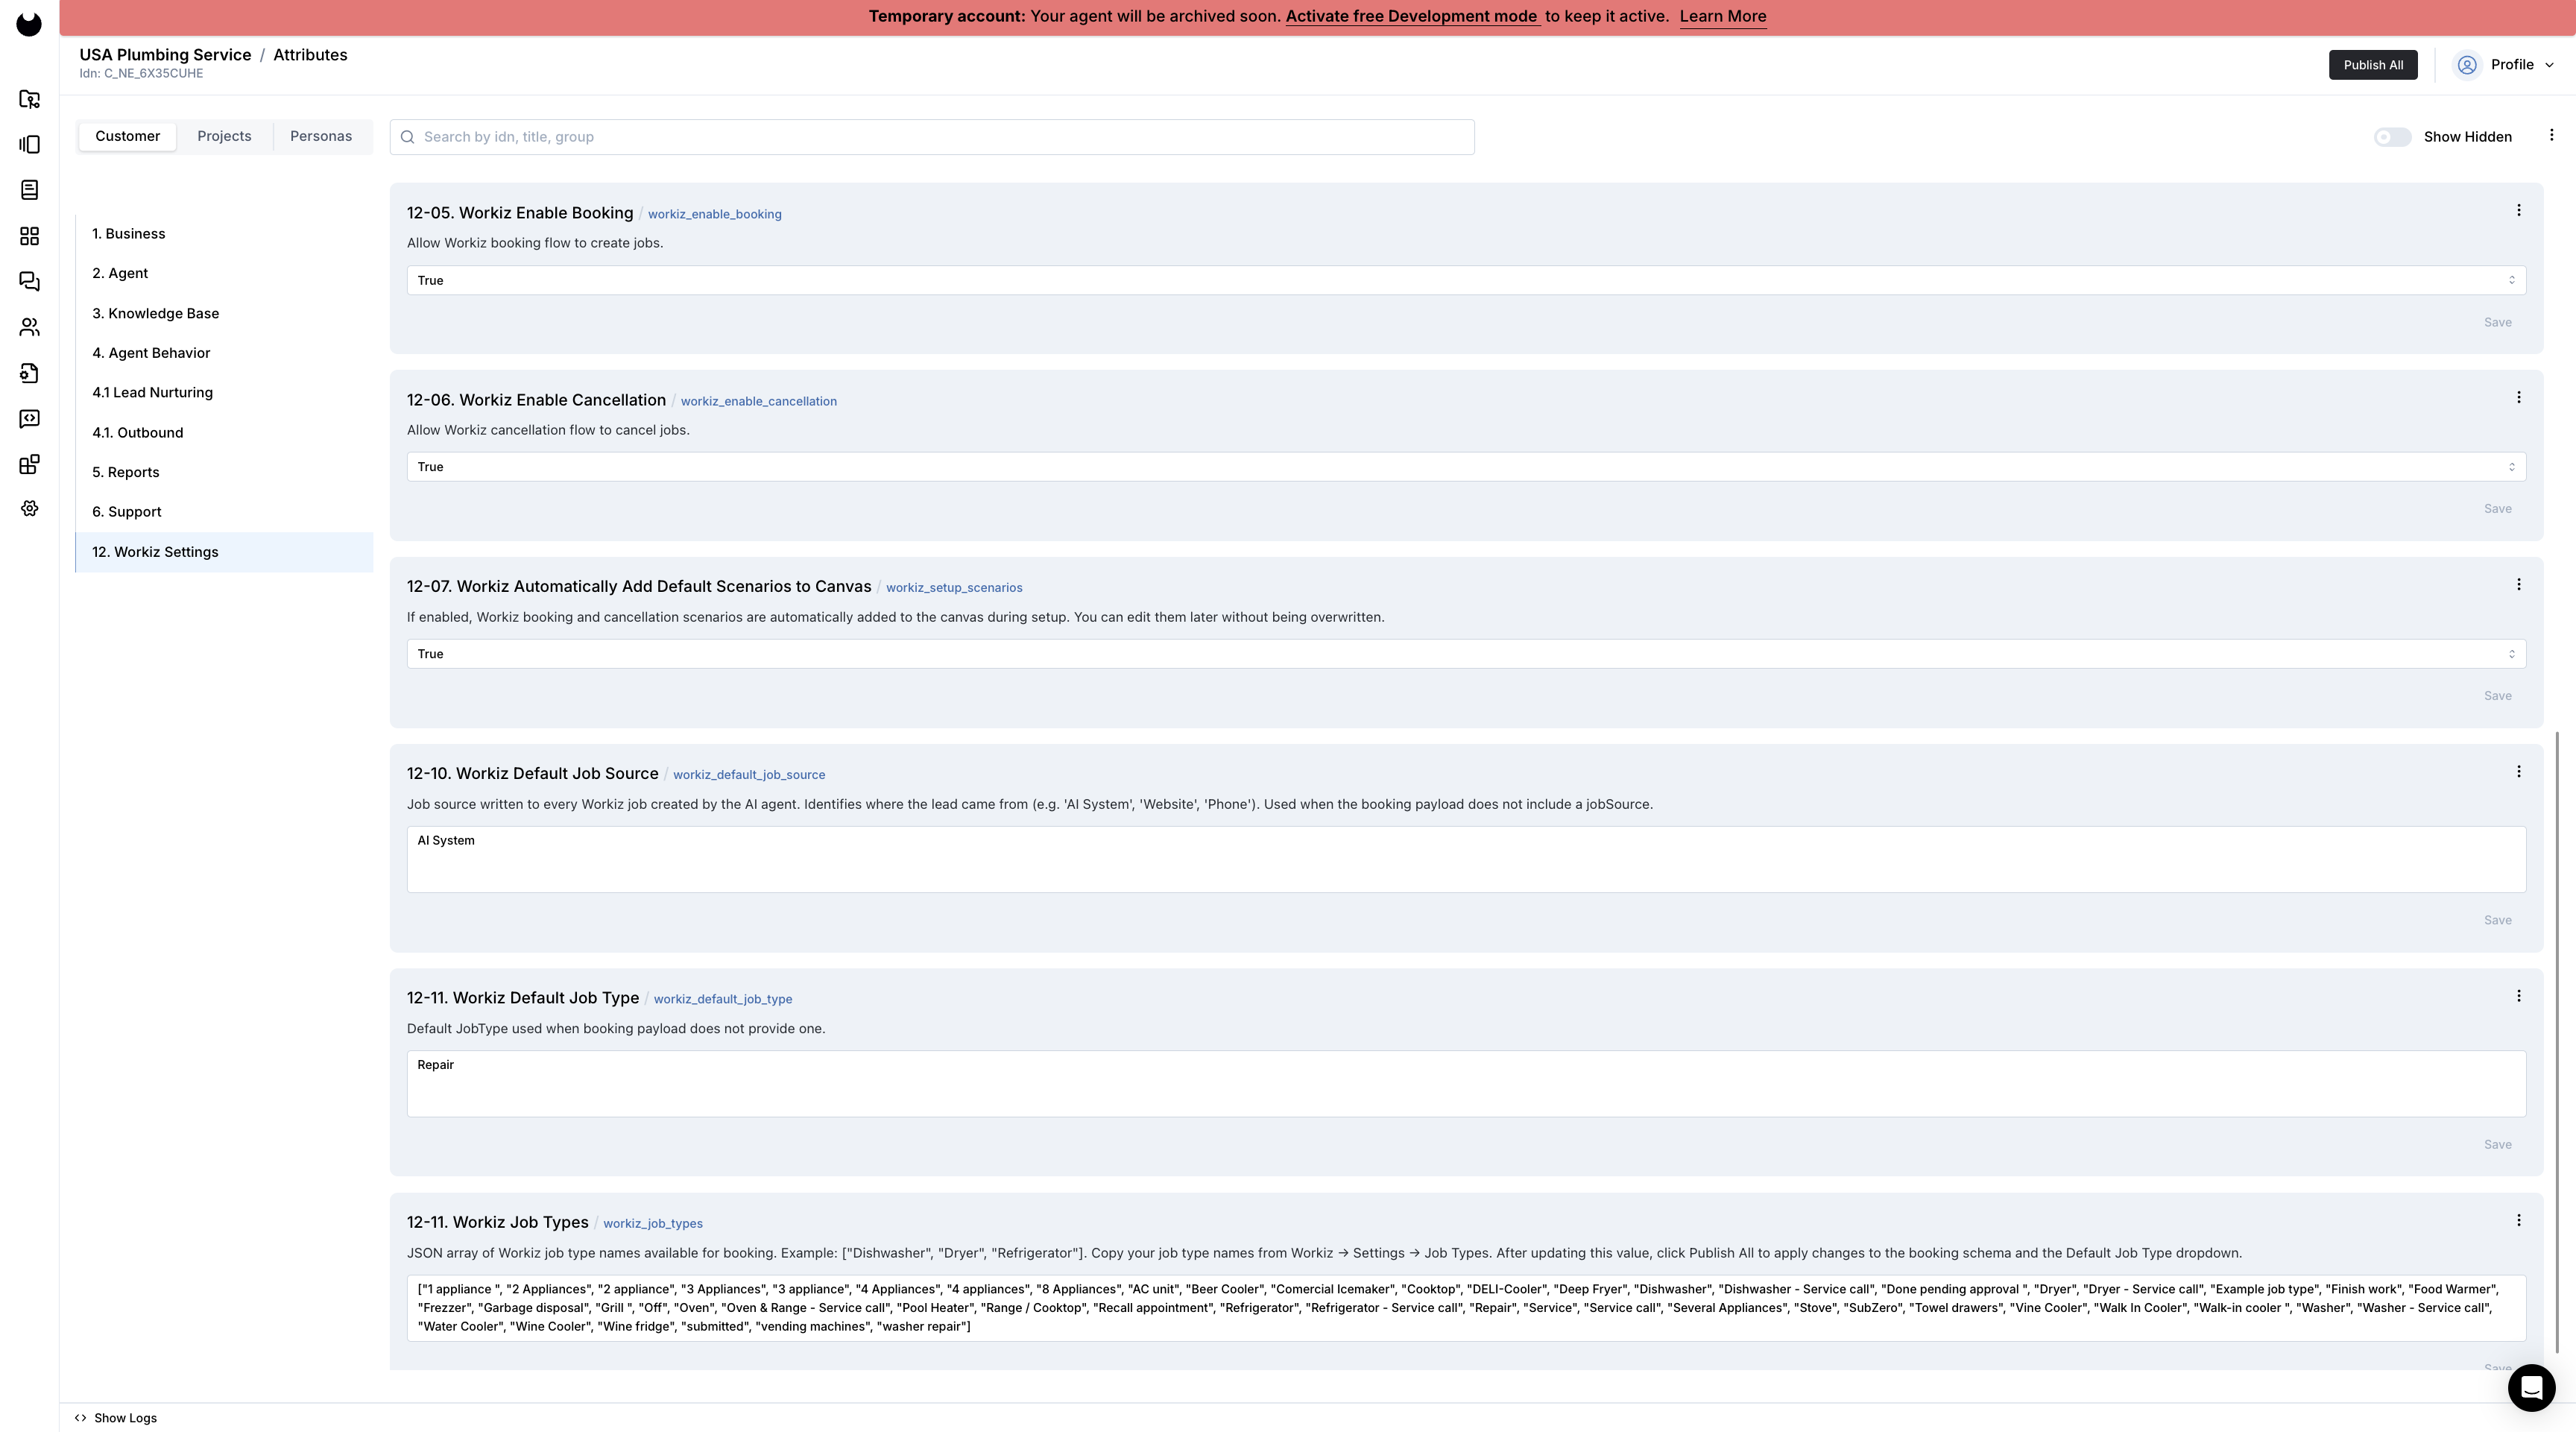
- Set the following attributes in Builder / Attributes:
| Attribute | Required | Default | Description |
|---|---|---|---|
workiz_api_key | ✅ | — | API Token from Workiz Settings |
workiz_api_secret | ✅ | — | API Secret from Workiz Settings |
workiz_base_url | ❌ | https://api.workiz.com/api/v1 | API base URL |
workiz_mode | ❌ | Production | Production for real API, DevMode for LLM emulation |
workiz_job_types | ❌ | [] | JSON array of job type names, e.g. ["Dishwasher", "Dryer"] |
workiz_enable_booking | ❌ | True | Enable job creation |
workiz_enable_cancellation | ❌ | True | Enable job cancellation |
workiz_setup_scenarios | ❌ | True | Auto-add booking/cancellation scenarios to canvas |
workiz_primary_assigned_user_id | ❌ | — | Primary technician (dropdown populated after team sync) |
workiz_default_job_source | ❌ | AI System | Job source label in Workiz |
📸 Screenshot: Newo Platform → Builder → Attributes showing Workiz settings
- Click Save + Publish All
- On publish, the InitFlow automatically:
- Prepares the connection for Workiz API
- Sets all customer attributes with metadata
- Registers booking and cancellation tools on ConvoAgent
- Syncs dispatcher team members from Workiz
- Populates the technician assignment dropdown
📸 Screenshot: Workiz Primary Assigned User dropdown populated after publish

How to use the integration
4.1 How the Integration Works
The integration uses Workiz Jobs API for creating and cancelling jobs, and Team API for syncing dispatcher members. Authentication uses API Key (in URL path) and API Secret (in request body).
- A Trigger is a system event that starts a flow
- An Action is the API operation performed in Workiz
Canvas scenarios
When workiz_setup_scenarios is True (default), Publish All automatically adds:
Scenarios:
- "Scheduling Appointment via Agent" (
workiz_schedule_appointment_via_agent_scenario) — 10-step guided booking flow that collects all required fields (name, phone, email, address, ZIP, job type, date/time) with code-phrases - "Canceling Appointment via Agent" (
cancellation_via_agent_scenario) — 6-step cancellation flow with confirmation and code-phrases
Intent Types:
- "[L] Appointment via Agent" (
library_intent_types_common_appointment_agent) — from library - "[T] Cancellation via Agent" (
cancellation_via_agent_intent) — caller wants to cancel
Where to test
Testing can be done through the Newo conversation interface (chat or voice).
DevMode: Set workiz_mode to DevMode to test without real API credentials. The integration will use LLM to generate realistic Workiz API responses.
How to test that everything works
To test the integration:
- Setup: Publish the project and verify team sync completed (check
workiz_dispatcher_team_membersattribute) - Booking: Request a service — provide name, phone, email, address, job type, and date → verify job created in Workiz
- Cancellation: Ask to cancel — verify job status changed to "Canceled" in Workiz
- Existing Client: Call with a known phone number → verify agent finds existing bookings
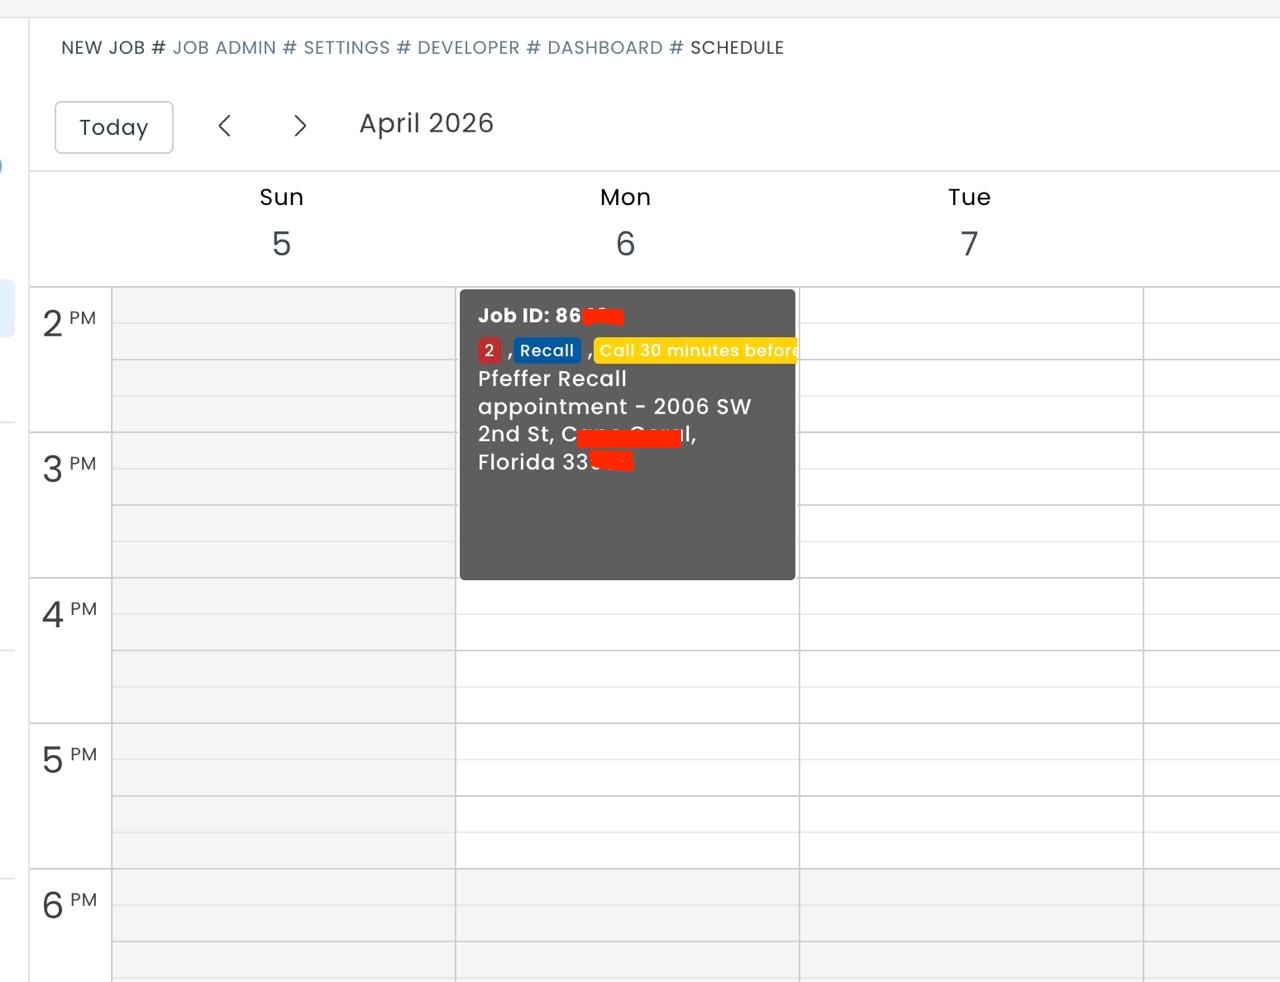
📸 Screenshot: Workiz dashboard showing a job created by the AI agent
If no action occurs:
- Ensure API credentials are set (
workiz_api_key,workiz_api_secret) - Verify
workiz_modeisProduction(notDevMode) - Check feature flags (
workiz_enable_booking,workiz_enable_cancellation) - Confirm
workiz_job_typesarray matches your Workiz job types exactly - Verify
workiz_primary_assigned_user_idis selected (must publish first to populate dropdown) - Re-publish after configuration changes
Note: This integration creates real jobs in Workiz. Jobs and cancellations are reflected in the live Workiz system.
FAQ
Q: How does authentication work?
A: Workiz uses two credentials: API Key (embedded in the URL path) and API Secret (sent in the POST body as auth_secret). No OAuth flow needed — just paste the values from Workiz Settings.
Q: What is DevMode?
A: When workiz_mode is set to DevMode, the integration uses LLM (Gen) to emulate Workiz API responses instead of making real HTTP requests. Useful for testing the booking flow without creating real jobs.
Q: How is the technician assigned to a job?
A: After creating a job, the integration automatically calls the create/update request with the workiz_primary_assigned_user_id selected in the platform dropdown. This dropdown is populated from Workiz team members with dispatch/manager/admin roles.
Q: Why doesn't availability checking work? A: Workiz API does not provide an availability/capacity endpoint. The agent collects the preferred date/time from the caller and creates the job at that time. Scheduling conflicts are handled by dispatchers in Workiz.
Q: How does existing client lookup work?
A: When define_user_phone_number event fires, the integration fetches all jobs from today onward (the lookup request), filters by the caller's phone number, and stores matching future bookings in the persona's bookings attribute. This allows the cancellation flow to find the booking.
Q: What job types are supported?
A: Set workiz_job_types as a JSON array matching your Workiz configuration, e.g. ["Dishwasher", "Dryer", "Refrigerator", "Washer"]. The agent will present these as options and validate the selection before creating the job.
Q: What happens if the phone number format is different?
A: The integration normalizes phone numbers automatically — strips formatting characters (+, -, (, ), spaces, dots), handles 10-digit (prepends +1) and 11-digit (prepends +) US numbers.